Caliper rebuild vs replacement: how to assess the damage
A stuck brake caliper piston creates a mechanical fault before it creates a diagnostic code. The vehicle may pull under braking. One wheel may run hotter. The brake pedal may remain firm while the pad stays in contact with the disc.
Aldous Moorland·Updated: August 16, 2026·16 min read
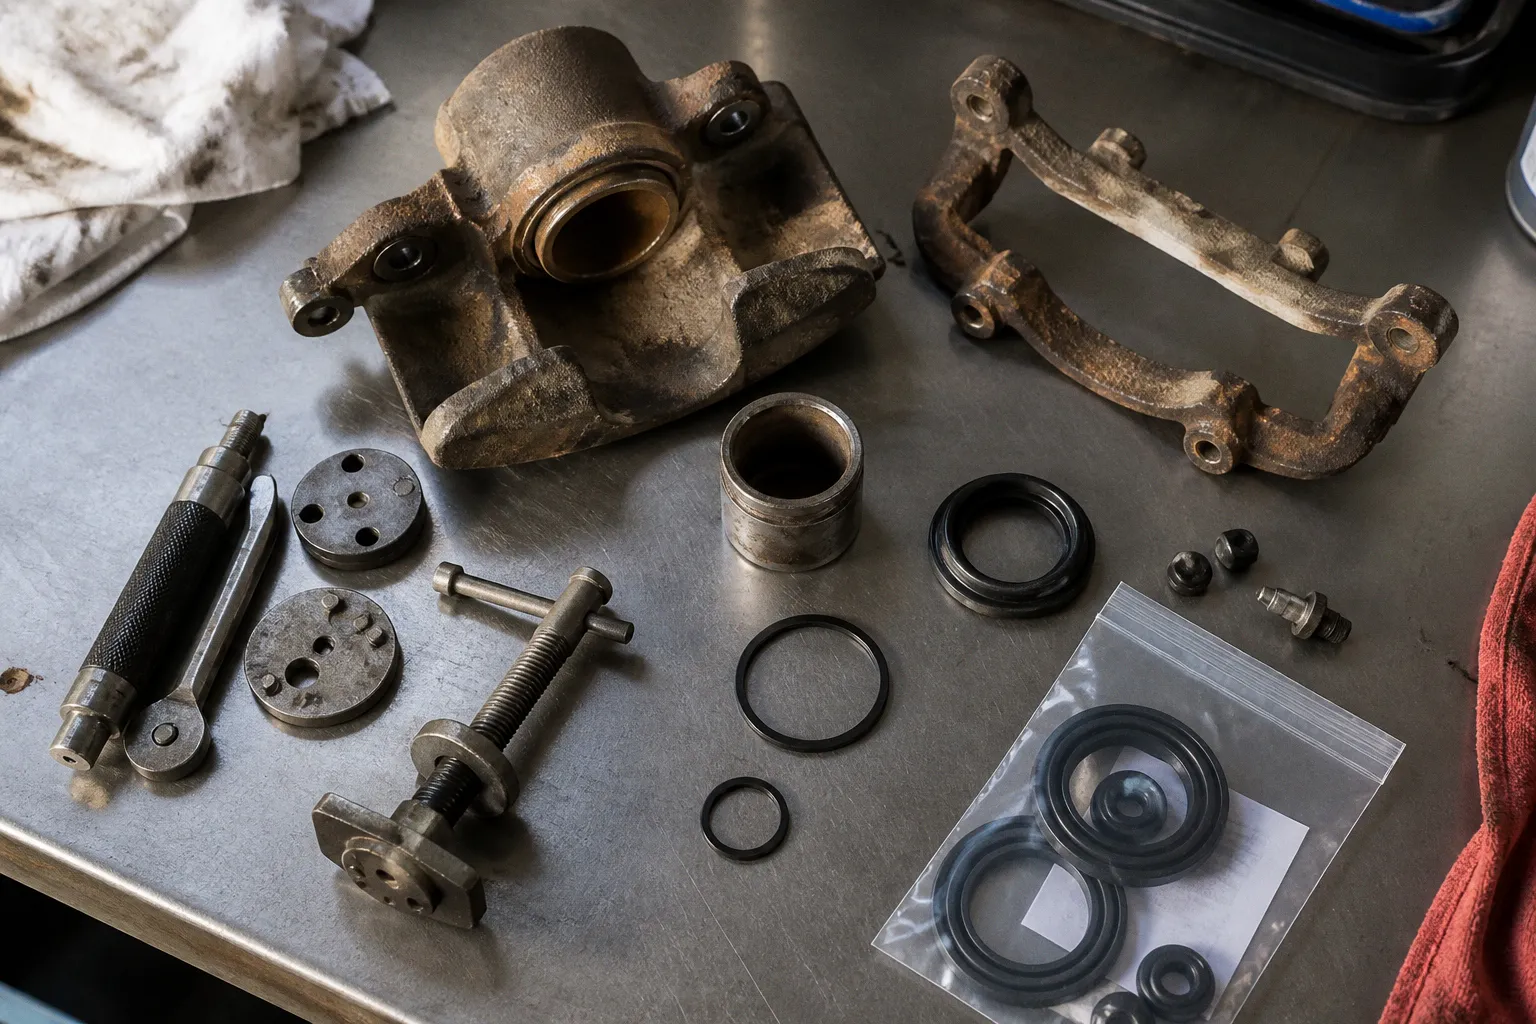
A torn dust boot, fluid seepage at the piston seal, or visible corrosion changes the decision immediately.
Compare car rental deals in United Kingdom
See available offersPartner link — DiscoverCars comparisonThe question is not whether a brake caliper can be disassembled. Most can. The question is whether the piston, bore, casting, hose port, and guide mechanism can return to their specified geometry after disassembly. If the answer is no, a brake caliper rebuild kit is not a repair. It is an incomplete intervention.
The cost difference is substantial. A repair kit generally costs $20–$70. A new caliper assembly commonly costs $100–$350 or more per wheel. A rebuild can cost approximately 15%–20% of the price of a new OEM replacement part, before labor and machining. That price advantage exists only when the caliper body is structurally sound.
A seal kit can restore sealing. It cannot restore metal removed by corrosion.
The caliper is not one failure point
A floating caliper contains several separate wear interfaces. They must be evaluated independently.
The piston moves inside the caliper bore. The square-cut hydraulic seal sits in a machined groove and provides the primary seal. The dust boot protects the piston and seal area from water, salt, and abrasive contamination. Guide pins allow the caliper body to move laterally. The hose port transfers hydraulic pressure into the caliper. The casting contains the hydraulic chamber and carries the reaction load from the pads.
A failure at one interface can produce symptoms at another.
If the piston is seized, the cause may be:
- corrosion on the exposed piston surface;
- corrosion inside the bore;
- a displaced or hardened square-cut seal;
- a torn dust boot that allowed water entry;
- swollen rubber caused by incompatible fluid or contamination;
- a collapsed flexible brake hose that traps hydraulic pressure;
- guide-pin seizure, with the piston still functional.
The distinction matters. Replacing the caliper will not correct a collapsed hose if the hose remains installed. Rebuilding the piston will not correct a bent bracket. Lubricating guide pins will not repair a pitted bore.
A proper assessment begins with the brake hydraulic system depressurized only according to the vehicle service procedure. The wheel is removed. Pad movement, piston movement, guide-pin movement, and fluid leakage are then separated as individual tests.
First decision gate: hydraulic pressure or mechanical seizure
If the brake remains applied after the pedal is released, the cause must be isolated before the caliper is condemned.
The sequence is direct:
1. The wheel is rotated with the vehicle safely supported.
2. The brake hose bleeder or hydraulic connection is assessed according to the service procedure.
3. If trapped pressure is released and the wheel frees, the fault may be upstream: hose restriction, master-cylinder return issue, ABS hydraulic unit fault, or incorrect pedal adjustment.
4. If pressure is absent but the pad remains clamped, mechanical seizure exists at the piston, guide pins, pad lands, or bracket.
5. If only one pad is worn, guide movement or pad binding becomes more likely.
6. If both pads are heavily worn and the disc shows heat damage, piston retraction and hydraulic release must both be checked.
The phrase “stuck caliper” describes a symptom, not a component diagnosis.
On vehicles equipped with electronic parking brakes, the parking-brake actuator must be placed in the correct service position before rear-caliper work. Forced piston rotation or compression against an active actuator can damage the mechanism. The required method varies by platform. Some systems retract electrically. Some require a scan tool. Some use a mechanical wind-back procedure.
Second decision gate: the external piston surface
The piston must be removed far enough to expose the working surface. The area that travels through the hydraulic seal is the relevant area. A polished outer edge does not compensate for corrosion in the seal-contact zone.
The piston should be rejected if any of the following is present:
- deep pitting that can be felt with a fingernail;
- flaking chrome or plating loss;
- circumferential corrosion at the seal-contact surface;
- scoring that follows the piston axis;
- distortion or ovality;
- a damaged piston face that prevents correct pad contact;
- corrosion extending under the dust-boot seat.
Light staining is not equivalent to deep pitting. Surface discoloration can sometimes be removed during cleaning. Material loss cannot be cleaned away. Abrasive paper must not be used to change the piston diameter or bore geometry. A piston that requires aggressive polishing has already entered replacement territory unless a dimensionally correct replacement piston is available and approved for that caliper.
The piston material also matters. Many calipers use plated steel pistons. Some use stainless steel. Some use phenolic or composite pistons. The correct replacement must match the original application. A visually similar piston with a different length, diameter, or pad-contact profile can alter piston travel and pad seating.
The bore determines whether rebuilding is viable
The bore is the central inspection point in a caliper rebuild.
After the old seal is removed, the seal groove and bore are cleaned with a compatible brake-cleaning method. No contamination may remain in the groove. The bore is then inspected under direct light. A mirror-like finish is not required across every internal surface. The seal-contact region must be free from deep corrosion, sharp edges, cracks, and deformation.
A rebuild is viable if the following conditions are met:
- the casting is intact;
- the bore remains round and dimensionally correct;
- corrosion is superficial;
- the seal groove is not eroded;
- the piston is serviceable or a correct replacement is available;
- the hose port and bleeder threads are intact;
- the guide-pin bores are not distorted;
- the caliper can be cleaned without removing significant base material.
A rebuild is not viable when a deep pit crosses the piston-seal contact region. The seal can deform around minor surface irregularities, but it cannot maintain a stable hydraulic boundary against substantial material loss. Leakage may appear immediately or after the brake heats up.
Casting damage is a replacement condition
A cracked caliper body is not a rebuild candidate. Neither is a damaged mounting ear, fractured bridge, or deformed hydraulic passage.
Replacement is required when:
- a crack is visible in the hydraulic chamber or mounting structure;
- the caliper casting has been distorted by impact or overheating;
- the hose port threads are stripped or cross-threaded;
- the bleeder port is damaged beyond approved repair;
- the piston bore is deeply pitted;
- a mounting ear is fractured;
- corrosion has reduced the integrity of the seal groove;
- a previous repair has enlarged or damaged the bore.
The casting does not have to look attractive. It has to retain hydraulic pressure and maintain alignment under load. Cosmetic oxidation on an external surface is irrelevant if the structural and hydraulic surfaces remain sound. A crack in the same area is decisive regardless of external appearance.
The cheapest correct repair is the one that restores the pressure boundary and pad geometry on the first installation.
Rebuild kit versus complete caliper
A caliper rebuild kit normally contains rubber components. Depending on the application, it may include the square-cut piston seal, dust boot, retaining ring, guide-pin boots, and sometimes guide-pin hardware. It does not necessarily include a piston, bleeder screw, guide pins, or replacement hardware.
The kit must be matched by caliper specification, not only by vehicle year and engine. Import vehicles frequently use multiple brake suppliers across the same model range. A kit for one casting may fit the vehicle but fail to fit the installed caliper.
A complete replacement caliper may arrive assembled, painted, loaded with a piston and seals, or supplied as a bare casting. The term “new caliper” is not sufficiently precise. The unit may be new, remanufactured, or rebuilt. The included hardware must be identified before installation.
| Parameter | Rebuild with a kit | Replace with a complete assembly |
|---|---|---|
| Caliper body | Original body retained | New or remanufactured body installed |
| Piston | Reused only if undamaged, or replaced separately | Normally included, depending on assembly |
| Seals and boot | Replaced | Installed by supplier |
| Bore condition | Must be clean and free of deep pitting | Not dependent on the old bore |
| Casting condition | Must be structurally sound | Old casting removed from service |
| Typical part cost | About $20–$70 for the kit | About $100–$350 or more per wheel |
| Labor | Disassembly, cleaning, inspection, assembly, bleeding | Removal, installation, bleeding |
| Main risk | Hidden corrosion or incorrect reassembly | Incorrect part, poor remanufacturing, unresolved upstream fault |
| Best use | Sound casting with damaged seals or light contamination | Cracked casting, pitted bore, seized or damaged piston |
A rebuild is not automatically faster. Disassembly can expose seized pistons, damaged threads, corroded guide pins, and contaminated hydraulic passages. Labor for caliper work can range from approximately $100–$200 per axle, depending on vehicle design and access. The labor difference between the two options may be smaller than the part-cost difference.
A replacement is also not automatically correct. The replacement unit must match piston diameter, mounting configuration, hose connection, bleeder position, pad interface, and parking-brake design. A caliper that bolts to the knuckle but positions the bleeder below the fluid chamber cannot be bled correctly. A caliper with a different piston area can alter pedal travel and brake balance.
Inspection of the piston, seal, and dust boot
The dust boot is often the first visible failure. It is not always the first mechanical failure.
If the boot is torn but the piston and bore remain clean, a seal-and-boot rebuild may restore the caliper. If water has remained behind the boot, corrosion may already have progressed into the piston surface and bore. The boot condition therefore determines the inspection depth. It does not determine the repair by itself.
The square-cut seal must be removed without scratching the groove. A metal pick used carelessly can create a line that becomes a leak path. The seal groove must be cleared of corrosion products and residue. If the groove has lost its original profile, the caliper body should be replaced.
The piston must enter the bore without force beyond the specified assembly method. Hydraulic fluid compatible with the vehicle system is used as assembly lubricant unless the manufacturer specifies another product. Petroleum grease and general-purpose lubricants are not acceptable in the hydraulic chamber. They can swell brake-system rubber and contaminate the fluid.
The dust boot must be seated fully in both its piston groove and caliper groove. A boot that is folded, twisted, or partially retained will admit water. The caliper may operate correctly at installation and seize later.
Guide pins are a separate repair
A floating caliper can drag with a perfect piston if one guide pin is seized.
The guide pins are removed and inspected for:
- rust under the rubber boot;
- scoring;
- bent shafts;
- loss of plating;
- hardened or torn boots;
- incorrect grease;
- blocked drainage or venting in the boot.
The guide pin must slide through its full working range without binding. It must not be replaced with a pin of uncertain length or profile. The pin controls caliper position relative to the bracket. A substitute with the wrong shoulder or diameter can create lateral pad misalignment.
The lubricant must be compatible with the guide-pin boot and specified for brake hardware. Copper-based or petroleum-based products can damage some rubber compounds. Excess grease can block a blind guide-pin bore and prevent full seating.
Pad abutment surfaces must also be cleaned. Rust buildup under stainless pad clips can reduce pad clearance. The result resembles piston seizure. The pad then remains in contact with the disc even though the hydraulic piston retracts correctly.
Disc, pad, hose, and bearing effects
Caliper evaluation cannot be separated from the rest of the corner assembly.
A brake disc that has experienced prolonged drag may show blue heat marks, cracks, heavy scoring, or thickness variation. A new or rebuilt caliper installed against a damaged disc can produce repeat vibration or uneven braking. Brake pads exposed to excessive heat may be glazed or contaminated. Replacement of the caliper alone may leave the original braking fault in the system.
Brake discs are commonly recommended for initial inspection after approximately 30,000 kilometres. Their service life varies by vehicle, driving pattern, climate, axle load, and disc thickness specification. A broad average of 120,000–180,000 kilometres is sometimes cited, but that range cannot replace the minimum-thickness measurement stamped or specified for the disc.
The flexible brake hose must be checked when a piston remains applied. Internal hose collapse can act as a one-way valve. Pressure reaches the caliper but returns slowly or not at all. If the caliper releases when the hydraulic connection is opened, the hose and upstream circuit become primary suspects.
Fluid leakage at the caliper should be classified by location:
- Piston seal area: piston, bore, seal, or assembly fault.
- Hose-to-caliper connection: sealing washer, flare, port, or hose fault.
- Bleeder screw: damaged seat, loose screw, or contamination.
- Hydraulic pipe thread: thread damage or incorrect fitting.
- ABS line connection: fitting or component-specific fault.
A wheel bearing can create disc runout symptoms and pad knock-back. Excessive bearing play can produce a low pedal after cornering even when the caliper is serviceable. Steering and suspension movement can also be misdiagnosed as brake instability. The fault must remain attached to the component that fails its test.
Rebuild procedure: the non-negotiable sequence
The exact procedure is vehicle-specific. The following logic applies to a standard hydraulic floating caliper when the manufacturer permits rebuilding.
1. Remove the caliper and control the brake hose.
The hose must not be left supporting the caliper. Hydraulic contamination must be prevented. The sealing method must not damage the hose.
2. Extract the piston without scoring the bore.
Compressed air can eject the piston with high force. A block or controlled restraint must be used. Fingers must remain outside the piston path.
3. Remove the old seal and dust boot.
The bore groove must be inspected after all rubber material is removed.
4. Clean the casting and hardware.
Brake fluid passages, the bleeder port, guide-pin bores, and pad lands must be free of debris. Abrasive blasting must not contaminate hydraulic surfaces.
5. Measure or assess the bore and piston.
If pitting is deep, the rebuild stops. If the piston is damaged, the piston is replaced with the correct part. If the casting is cracked or the threads are damaged, the assembly is replaced.
6. Install the new seal and boot.
The seal must not be twisted. The boot must be retained at both ends. The assembly lubricant must be compatible with the brake fluid and rubber.
7. Install and verify piston movement.
The piston must move squarely. Any binding indicates a problem with the seal, piston, bore, or installation.
8. Service the guide pins and pad hardware.
Free movement must be confirmed before the caliper is fitted.
9. Install the caliper and bleed the hydraulic system.
The specified bleeding order and fluid type must be used. ABS-equipped vehicles may require a scan-tool bleed procedure if air entered the modulator.
10. Inspect for leaks before road testing.
Hydraulic pressure must be applied and maintained while the caliper, hose, bleeder, and connections are checked.
If any gate fails, the caliper is not returned to service.
When replacement is the more controlled decision
Replacement is preferred when the caliper body has been exposed to severe corrosion, when the piston is deeply pitted, or when the rebuild would require uncertain machining. It is also preferred when the vehicle must be returned to service with controlled risk and a correct assembly is available.
A remanufactured caliper requires its own inspection. The casting may have been cleaned and painted while the piston, bore, or guide mechanism remains marginal. The core-return policy does not establish technical quality. Before installation, the bleeder position, piston face, guide-pin movement, dust-boot seating, and hose-port condition must be checked.
Calipers on the same axle should not be replaced as a matched pair by default. A single failed caliper can be replaced if the opposite unit is sound and the braking system remains correctly balanced. However, both sides must be inspected. Similar corrosion exposure and similar mileage can produce similar failure progression. Pad condition and disc condition should be compared across the axle.
A rebuilt original caliper may be preferable to an unknown low-cost replacement when the original casting is intact and the correct seals and piston are available. An OEM replacement may be preferable when the bore is corroded or when the vehicle uses an integrated parking-brake actuator. The decision is based on component condition, not on the word “rebuild” or “new” printed on the box.
Verification after the repair
The repair is not verified when the caliper is bolted on. It is verified when the hydraulic system remains sealed, the wheel releases, the pads contact correctly, and the vehicle stops without directional pull.
The following baseline must be established:
- Brake fluid level correct.
- No leakage at the piston seal, hose port, bleeder, or hydraulic line.
- Brake pedal firm after bleeding.
- No air-related pedal travel.
- Caliper piston and guide pins move as designed.
- Pads sit flat in the bracket and contact the disc evenly.
- Wheel rotates without abnormal drag after pedal release.
- Parking brake releases fully on rear systems.
- Disc and pad surfaces show no immediate abnormal hot spot.
- Vehicle does not pull under light and moderate braking.
- ABS and brake warning lamps remain off after the system self-check.
- Disc thickness, runout, and pad thickness remain within the vehicle manufacturer’s limits.
Temperature comparison can be useful after a controlled road test, but the readings must be interpreted by axle position and ambient conditions. One wheel being significantly hotter than its opposite side indicates unresolved drag. A temperature number without a comparison is not a diagnosis.
If the pedal is soft after a correct bleed, the fault may remain in the hydraulic circuit. If the wheel drags immediately, piston, guide pin, pad fit, hose restriction, and parking-brake release must be retested. If the vehicle pulls only under braking, pad friction, disc condition, piston movement, and suspension alignment must be separated.
The correct result is not simply a quieter brake or a wheel that turns by hand. The result is a sealed hydraulic system, controlled piston retraction, free guide movement, even pad contact, and braking performance that returns to the vehicle’s specified baseline.
In the comparison of caliper rebuild vs replacement, the decision is therefore mechanical. A clean bore, intact casting, serviceable piston, and undamaged threads support rebuilding. Deep pitting, cracks, distorted mounting points, damaged ports, or uncertain piston geometry require replacement. The price of the part is secondary to the condition of the pressure boundary.
The final acceptance parameters are exact: no hydraulic leakage, correct piston and guide-pin movement, firm pedal, correct pad seating, free wheel rotation after release, no abnormal heat rise, and disc and pad measurements within specification. If those conditions are not met, the repair is not complete.