Brake Caliper Rebuild vs Replacement: When to Choose Each
A brake caliper is not automatically a rebuild candidate because a seal kit is cheap, and it is not automatically a replacement candidate because the piston is difficult to remove.
Merritt Vane·Updated: July 31, 2026·17 min read
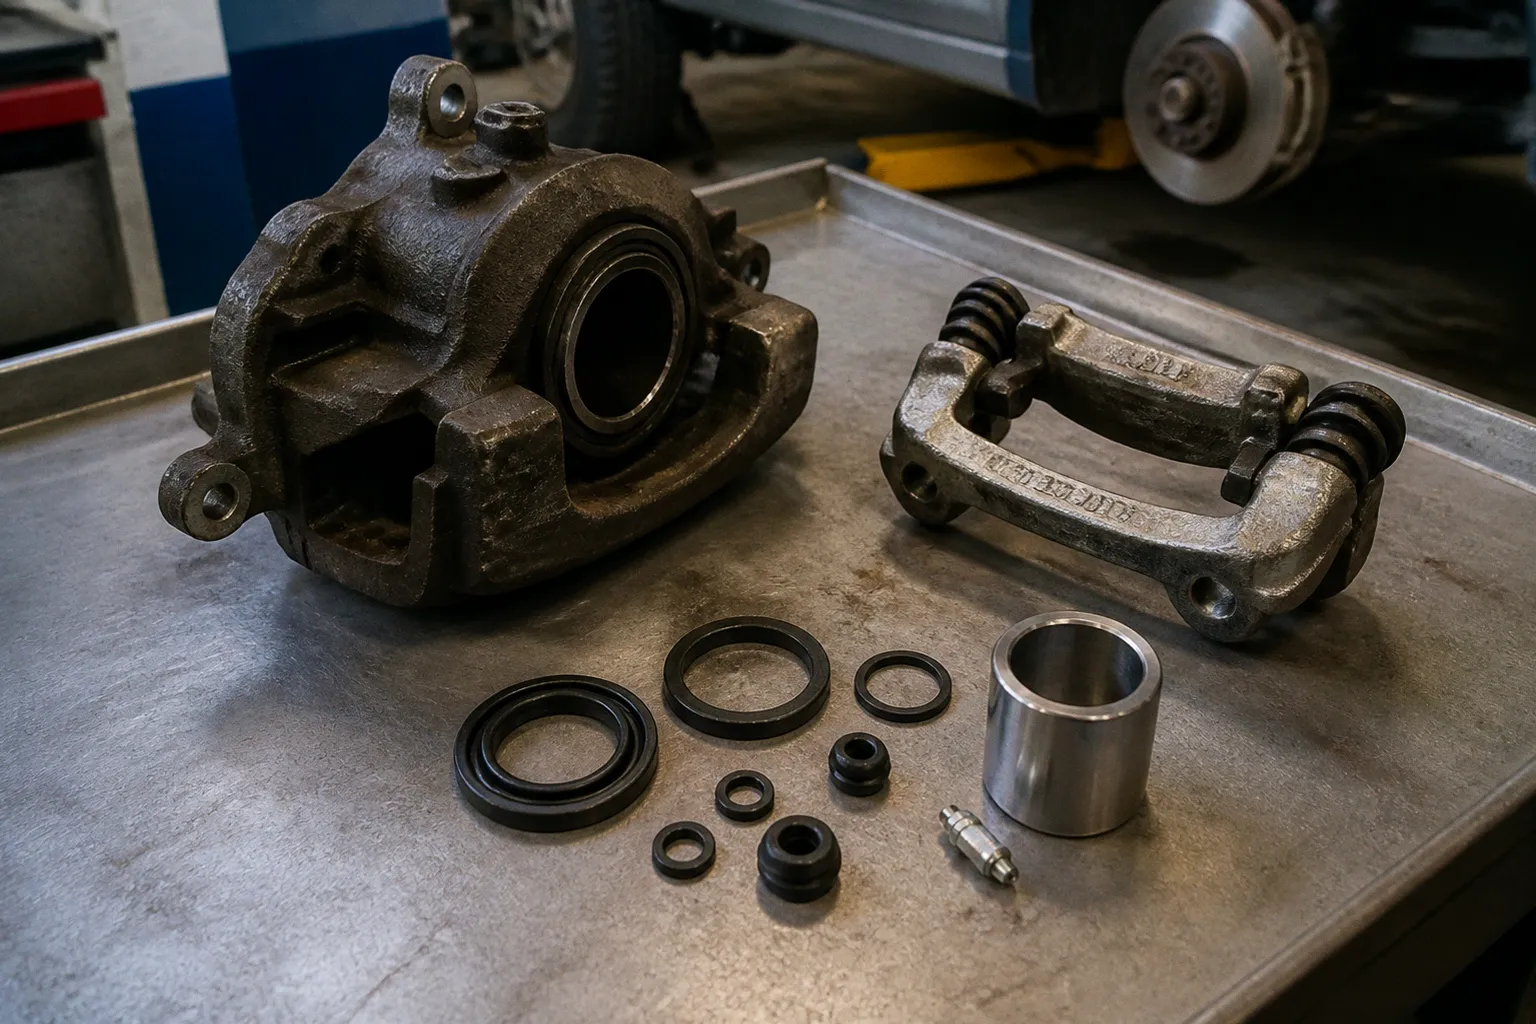
The real decision is made by the condition of the bore, piston, threads, mounting points, and the rest of the hydraulic system. Rubber parts are replaceable. Damaged parent metal is not.
Compare car rental deals in United Kingdom
See available offersPartner link — DiscoverCars comparisonThe brake fluid specification matters as well. Glycol-based fluids such as DOT 3, DOT 4, and DOT 5.1 are generally designed to absorb some moisture over time, while silicone-based DOT 5 follows a different chemistry and should never be treated as an interchangeable top-up fluid. The service manual, reservoir marking, and manufacturer-approved parts should settle the question before a caliper is opened.
A caliper rebuild kit restores hydraulic sealing; it cannot restore a pitted bore.
Assessing Internal Damage: When a Rebuild is Doomed to Fail
The rebuild-versus-replace decision is fundamentally an inspection decision, not a parts-price decision. A caliper rebuild kit usually contains the components most likely to deteriorate with age: the pressure seal, dust boot, and sometimes a bleed screw, guide-pin boots, or small hardware. The exact contents vary by application. Some kits include a piston; others assume that the original piston and all metal surfaces are serviceable.
That distinction is important. A kit can renew flexible sealing components, but it cannot correct a bore that has lost its usable surface or a piston that has been deeply scored. On a sound casting, replacing the seal and boot can return the caliper to reliable service at a fraction of the cost of a complete assembly. On a corroded casting, the same kit may simply postpone the failure.
What to inspect after removing the piston
The internal bore is a precision working surface. The square-cut piston seal sits in its groove and flexes as the piston moves during braking and release. The piston itself must move smoothly through the seal without cutting, binding, or carrying corrosion into the rubber. That system can tolerate light staining and superficial oxidation; it cannot tolerate sharp pits or deep scoring in the areas swept by the seal.
Inspect the parts under bright, angled light rather than relying on a quick glance. Look for:
- Pitting in the bore, especially around the seal groove and the section where the piston travels. Small dark marks may be staining, but cavities with defined edges are a different matter.
- Scoring on the piston, including a groove that can be felt with a fingernail. A piston with light surface discoloration may be reusable; one with deep rust damage usually is not.
- Damage to the seal groove. Corrosion under the square-cut seal can distort its seating and make a new seal leak or drag.
- A torn or hardened dust boot. The boot does not create hydraulic pressure, but it keeps water and road contamination away from the piston surface.
- Damaged bleed-screw threads or a blocked bleeder. A caliper that cannot be bled cleanly is not ready to return to service.
- Cracked mounting ears, damaged guide-pin bores, or distorted hardware. These are replacement or specialist-repair issues, not problems a rubber kit solves.
A uniform gray film or mild staining can often be cleaned with an approved brake-system cleaner and a suitable non-damaging brush. Do not aggressively hone the bore simply to make it look bright. Removing material changes the fit between the bore, seal, and piston. If the service manual permits honing for that specific caliper, the result still needs to remain within the manufacturer’s dimensional limits. For many modern calipers, especially those with plated or specially finished pistons, replacing the damaged piston is safer than trying to polish it into submission.
Heat damage needs a separate judgment
A caliper that has overheated may show discoloration, cooked dust boots, damaged guide-pin grease, or a piston that is difficult to retract. Heat alone does not prove that the casting is unusable, but it is a reason to investigate the cause before rebuilding anything. A seized guide pin, collapsed flexible hose, parking-brake mechanism, incorrect pad fit, or wheel-bearing problem can keep a brake applied and create the heat in the first place.
If the casting is visibly distorted, the piston has suffered severe heat damage, or the seal groove has lost its shape, replacement is the sensible route. A rebuilt caliper installed without correcting the original cause may fail again, regardless of how carefully the new seal was fitted.
The same caution applies when a caliper is leaking. Brake fluid around the piston does not identify the cause by itself. The pressure seal may be cut, the piston may be corroded, the bore may be damaged, or fluid may be arriving from a hose connection or bleeder. Clean the area, apply controlled pedal pressure, and identify the exact leak before ordering parts. If the source cannot be established confidently, the vehicle should not be driven.
The Economics of Braking: Comparing Parts and Labor Costs
When the caliper passes inspection—usable bore, sound piston or an approved replacement piston, intact threads, and no structural damage—the rebuild option can make financial sense. The parts cost is usually modest, but the labor is not necessarily trivial. Removing the caliper, extracting the piston, cleaning the bore, installing the seal without damage, and bleeding the system can consume most of a day for a first-time DIY repair.
A replacement caliper is faster to install, but it is not always a plug-and-play purchase. The part may arrive without a bracket, guide pins, a banjo bolt, or a bleeder cap. Some applications use a left- and right-hand-specific caliper, while others integrate the parking-brake mechanism or an electronic actuator. Confirm what is included before comparing a rebuild kit with a complete assembly.
| Cost component | Rebuild path | Remanufactured caliper | New OEM or high-quality replacement |
|---|---|---|---|
| Main parts cost | Usually the lowest; kit contents vary by application | Moderate; often includes seals, piston, and tested hardware | Usually the highest |
| DIY time | Highest, especially if the piston is seized | Lower; mostly removal, transfer of hardware, and installation | Lower, subject to fit and hardware |
| Shop labor | Can exceed the value of the part if cleaning and extraction are difficult | More predictable | More predictable |
| Condition of original casting | Must be sound | Assessed by the remanufacturer | Not dependent on the old casting |
| Bleeding requirement | Yes | Yes | Yes |
| Main risk | Misjudging bore or piston condition | Inconsistent supplier quality or missing hardware | Price, availability, or incorrect application |
Prices vary sharply by vehicle, region, brake design, and supplier, so the useful comparison is not the kit price alone. Add the cost of a replacement piston if required, fresh fluid, damaged bleeder hardware, cleaning supplies, and the value of your time. If the caliper is already off the vehicle and the bore is clean, rebuilding may be efficient. If the piston requires force, the bleeder is seized, or the guide-pin bore is contaminated, the apparent savings can disappear quickly.
Professional labor also depends on what the technician finds. A straightforward replacement may be relatively quick, while a rusted brake hose fitting or seized mounting bolt can turn a simple job into a much longer repair. Rebuilding at a shop may involve more cleaning and inspection time than replacing the assembly. Ask whether the quoted service includes bleeding, fluid replacement, replacement hardware, and inspection of the opposite caliper.
The brake caliper replacement cost versus rebuild cost should therefore be treated as a system-level comparison:
1. Price the correct kit, not the cheapest kit with a similar-looking seal.
2. Check whether the piston and guide-pin boots are included.
3. Include fluid and bleeding in both options.
4. Account for return shipping or a core charge on a remanufactured unit.
5. Compare the warranty terms, not just the shelf price.
6. Decide whether a failed rebuild would cost more in time and repeat labor than the replacement part.
The economic case for rebuilding collapses when the internal inspection is unfavorable. Spending less on the initial part is not saving money if the vehicle must be dismantled again, the pads and rotor are contaminated, or a hydraulic leak develops after the repair.
Technical Requirements for a Successful DIY Caliper Overhaul
A DIY caliper rebuild is within the ability of an experienced home mechanic, but it is not a casual rubber-gasket job. Brakes are safety-critical, and the work should stop at any point where the procedure in the service manual differs from a generic method. Some calipers use a threaded piston, an integrated parking brake, or an electronic actuator. Those designs may require a wind-back tool, scan-tool procedure, or a different disassembly sequence.
Before starting, obtain the repair information for the exact vehicle and brake configuration. Confirm the fluid specification, bleeding order, torque values, piston orientation, seal lubricant, and whether the manufacturer permits rebuilding the caliper. The reservoir cap and service literature may identify the required fluid, but do not assume that a fluid name alone defines compatibility with every aftermarket seal. The rebuild-kit manufacturer should also specify the applications and fluid types for which its seals are intended.
A safe working sequence
1. Secure the vehicle properly. Use a level surface, wheel chocks, correctly rated stands, and eye protection. Never rely on a jack while working underneath or beside the vehicle.
2. Keep the hose and fittings under control. Do not allow the caliper to hang from the brake hose. Support it with a hook or stand, and cap or protect an open hydraulic line using a method approved for the system.
3. Release the piston with controlled pressure. A suitable piston tool or low-pressure hydraulic method is preferable. Never put fingers in front of a piston that may move, and do not use uncontrolled compressed air. If compressed air is permitted by the service procedure, the piston must be restrained with a proper block and the operator must stand clear.
4. Remove every old rubber component. The pressure seal, dust boot, and any guide-pin boots should not be reused. Remove the seal without scratching its groove.
5. Clean only with compatible products. Use fresh brake fluid or a cleaner explicitly suitable for brake components. Petroleum-based solvents can damage some rubber parts and leave residues. Keep abrasive debris out of the bore.
6. Inspect before installing the new parts. Do not fit the seal first and hope the piston will make the problem disappear. The piston, bore, seal groove, threads, and dust-boot seating area all need to pass inspection.
7. Lubricate according to the kit instructions. Use only the supplied or specified lubricant. Silicone grease used for a dust boot or guide pin is not automatically suitable for the hydraulic seal, and ordinary chassis grease is not a substitute.
8. Install without twisting the seal. The seal must sit evenly in its groove. A twisted seal can create drag, leak, or push the piston back irregularly.
9. Refit the dust boot in the correct order. Some designs require the boot to be seated in the caliper before the piston is inserted; others require the boot to be attached to the piston first. Follow the vehicle-specific procedure.
10. Reinstall and bleed the system. Use the specified fluid from a sealed container, keep the reservoir from running dry, and follow the manufacturer’s bleeding sequence rather than relying on a universal wheel order.
The piston should not require brute force during installation. If it binds, remove it and look for a rolled seal, dirt in the groove, a damaged piston edge, incorrect orientation, or the wrong part. Forcing it can cut the new seal while hiding the problem until the vehicle is back on the road.
Fluid compatibility is conditional, not a guess
Fluid chemistry deserves more precision than the common advice to “avoid mixing types.” DOT 3, DOT 4, and DOT 5.1 are generally glycol-ether-based fluids, though their performance and additive packages differ. DOT 5 is silicone-based. A vehicle designed for one family should not be converted to another merely by draining the reservoir and adding a different fluid. The conversion, if it is permitted at all, requires a complete system-specific procedure and compatible components.
Glycol-based fluids are hygroscopic: they can absorb moisture over time, primarily through the vented reservoir and normal exposure during service. That does not mean every caliper bore reaches the same moisture level or that corrosion follows a fixed timetable. Climate, storage, reservoir condition, fluid age, contamination, and the condition of the seals all matter. Replace or flush the fluid according to the vehicle manufacturer’s schedule and the actual service conditions.
Silicone DOT 5 should be handled as a separate case. It is not interchangeable with glycol-based DOT 3, DOT 4, or DOT 5.1, and the vehicle manufacturer’s instructions take priority. A rebuild kit must be explicitly suitable for the fluid used in that system. If the manual specifies DOT 5, do not assume that a generic DOT 3/4 kit is acceptable; verify the seal material and application with the kit supplier or choose an assembly documented for that fluid.
Likewise, if the system has been incorrectly topped up with another fluid, do not diagnose the problem from chemistry alone. The correct response depends on the amount added, the fluids involved, the vehicle procedure, and the condition of the seals. Stop using the vehicle, consult the service manual, and flush or replace components as directed. Do not repeatedly add fluid in the hope that dilution will make an incompatible mixture safe.
Bleeding is part of the repair
Air left in the caliper or hydraulic line can produce a soft pedal, but so can other faults: a flexible hose that expands internally, excessive rotor runout, incorrect pad hardware, a leaking master cylinder, or a caliper that is moving on damaged guide pins. Bleeding must be done with the correct equipment and sequence, and the pedal should be checked for firmness only after the system is closed and the fluid level is correct.
After bleeding, inspect every connection for seepage. Refit the wheels using the specified torque, verify that the rotor turns as expected, and perform the first test in a controlled area at low speed. The pedal should remain firm under steady pressure. Any pull, leak, abnormal noise, or rapid change in pedal feel is a reason to stop and re-inspect the work.
The Case for Remanufactured Units as a Middle-Ground Solution
A properly remanufactured caliper can be the practical middle ground between a home rebuild and a new OEM assembly. The original casting is cleaned and inspected, and the unit is fitted with new service components according to the remanufacturer’s process. Depending on the application, that may include a piston, seals, dust boot, bleeder, guide hardware, or a tested bracket. The quality of the result depends heavily on the supplier’s inspection standards and on what the product description actually promises.
Do not treat every part labeled “rebuilt,” “remanufactured,” or “refurbished” as equivalent. Ask whether the bore is measured, whether damaged castings are rejected, whether the piston is replaced or merely cleaned, and whether the unit is pressure-tested. Check whether the caliper is supplied with the required bracket, clips, banjo washers, or slider hardware. A low-priced unit that requires several additional parts may no longer be the economical option.
The remanufactured route is particularly attractive when the original caliper has terminal corrosion but the rest of the brake system is in good condition. It avoids the time-consuming part of the job—the extraction, cleaning, and judgment call—while retaining a price advantage over many new assemblies. It is also useful for vehicles with complicated parking-brake mechanisms, limited parts availability, or a design that the owner does not want to dismantle on a first attempt.
Warranty terms deserve the same attention as the part itself. Coverage may depend on returning the old core, using specified pads, completing installation correctly, or providing proof of purchase. Some warranties cover the replacement part but not repeat labor, fluid, towing, or collateral damage. Read the conditions before installation, especially if the vehicle is a daily driver and downtime matters.
Replacing one caliper with a remanufactured unit while rebuilding the opposite side is not automatically wrong, but the two sides of the axle should be assessed together. Compare piston movement, pad contact, guide-pin condition, hose condition, and the history of each caliper. If one side has failed because of age or corrosion, the other may be close behind. If the opposite unit has recently been serviced and passes inspection, a single-side repair may be reasonable. The decision should be based on condition and design, not on a rule that every caliper must always be replaced in pairs.
Maintaining Balanced Stopping Power Across the Axle
A vehicle pulling during braking does not identify one single failed component. Unequal braking force can result from a sticking piston, seized guide pin, collapsed flexible hose, contaminated pad, uneven rotor surface, incorrect pad installation, a parking-brake mechanism that is not releasing, or a hydraulic leak. A caliper with a degraded seal is one possible cause, but it is not the default explanation for every pull.
The diagnostic pattern matters. A brake that drags may make the affected wheel hotter and can produce a burning smell or accelerated pad wear. A brake that is not applying properly may show a cooler rotor, uneven pad transfer, or a pedal that changes under repeated use. Comparing both sides of the axle after a controlled drive can provide a clue, but do not touch a hot rotor or caliper directly. Use an appropriate infrared thermometer if available, and remember that temperature differences are evidence for further inspection, not a diagnosis by themselves.
The conservative practice is to inspect both calipers, both flexible hoses, and the pad and rotor surfaces on the axle whenever one side requires major service. Rebuild or replace both sides when their condition is similar, when the vehicle has high mileage, or when corrosion has affected the axle broadly. A single-side repair can be justified when the other caliper is known to be recently serviced, moves correctly, has a sound boot and piston, and shows no evidence of leakage or drag.
Balanced braking comes from diagnosing both sides of the axle, not from replacing parts by habit.
Preventive maintenance starts with the dust boots and guide pins. Inspect the boots for cracks, splits, or a lip that has pulled out of its seat. Check that the guide pins move through their full range and that the specified lubricant is present. Do not mix lubricants casually: a product suitable for metal-to-metal guide pins may not be suitable for rubber boots, and some lubricants can cause rubber to swell.
Brake fluid maintenance should follow the vehicle manufacturer’s schedule and the fluid specification, not a universal mileage formula. For glycol-based fluids, moisture accumulation is a reason many manufacturers recommend periodic replacement, but the interval varies by vehicle, climate, usage, and service policy. A car exposed to road salt, repeated high-temperature braking, or long storage may need more attention than a lightly used vehicle in a dry environment. The reservoir cap, service manual, and approved fluid label are the references to use.
A fluid flush will not repair a pitted caliper, and a new seal will not correct a blocked hose or seized guide pin. Maintenance reduces the likelihood of contamination and corrosion; it does not remove the need for inspection when symptoms appear. Look for fluid loss, a torn boot, uneven pad wear, a hot wheel, a pull under braking, or a piston that will not retract as specified.
The brake caliper is a hydraulic cylinder exposed to water, salt, heat, vibration, and repeated pressure cycles. Rebuilding it is the right repair when the casting, bore, piston, threads, and hardware remain serviceable and the replacement parts are approved for the vehicle’s specified fluid. Replacement is the right repair when the working surfaces are pitted, the structure is damaged, the mechanism is beyond economical cleaning, or the inspection cannot establish a reliable result.
That is the useful meaning of brake caliper rebuild vs replacement. Start with the metal, confirm the fluid, identify the actual cause of the symptom, and then compare the cost of doing the job once with the cost of doing it twice. The parts decision becomes much clearer after those inspections.