Loaded struts vs bare struts: is the extra cost worth it?
There's a particular kind of ride we all recognize eventually. The nose dives hard under braking, the tail hunkers down when you punch the throttle, and a midcorner bump sets the whole car…
Judson Grier·Updated: August 12, 2026·20 min read
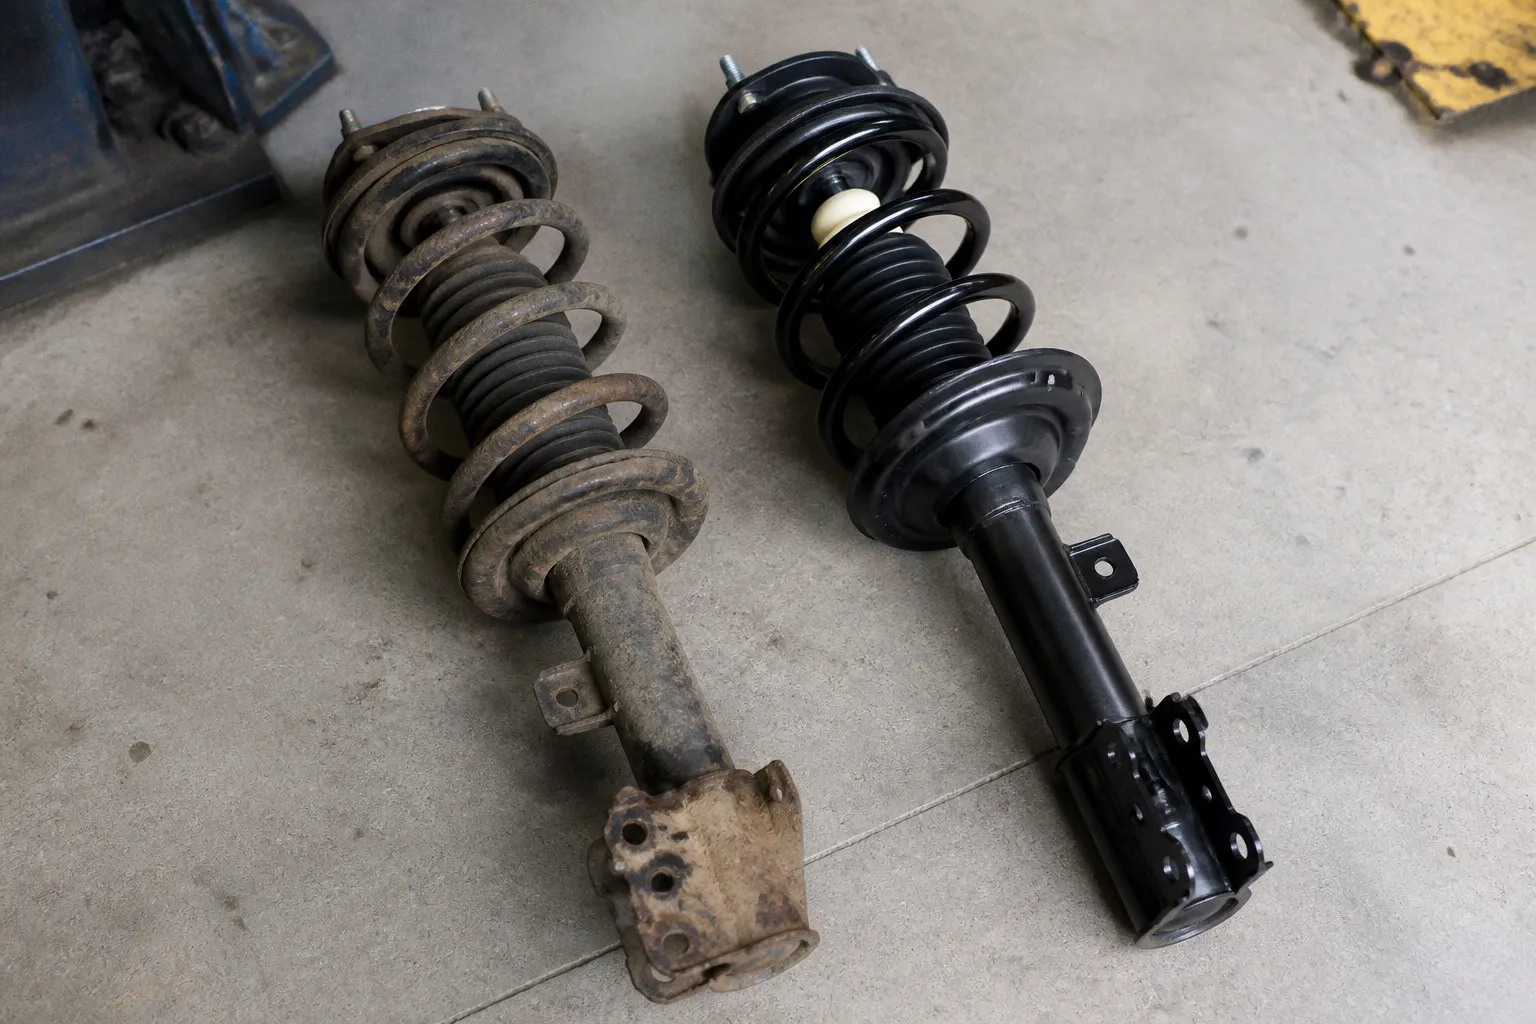
There's a particular kind of ride we all recognize eventually. The nose dives hard under braking, the tail hunkers down when you punch the throttle, and a midcorner bump sets the whole car oscillating long after the pavement goes flat — a slow, lazy heave you feel in your kidneys before you feel it in the steering. That's a tired strut talking. The oil is bypassing inside the damper, the valving can't keep up, and the car is surrendering the geometry work that's supposed to happen in milliseconds.
Compare car rental deals in United Kingdom
See available offersPartner link — DiscoverCars comparisonAnd then you go looking for replacements. Within ten minutes you're staring at two completely different product formats with completely different price tags. One is sold as a complete assembly — coil spring already seated, top mount already pressed in, boot and bump stop already in place. You bolt it on. The other is just a damper cartridge in a cardboard tube, cheaper on the shelf, but it expects you to take the old assembly apart with a spring compressor and transfer the hardware yourself.
That's the whole decision in two sentences. Everything else is how much you want that decision to actually cost you, how much of the original assembly is still worth reusing, and whether the replacement needs to preserve the factory ride height or deliberately change it.
The mechanics of quick struts versus bare cartridges
A loaded strut assembly — what the aftermarket often calls a “quick strut” — is a complete, pre-assembled replacement. Depending on the application, the box may contain the damper, coil spring, upper strut mount, bearing plate, dust boot, bump stop, spring isolators, and the necessary spring seat hardware. Pull it out of the box, compare it with the old part, transfer any application-specific brackets, and install it in the strut tower.
The important word is assembled, not energy-free. The coil spring has already been compressed and installed at the factory. It is still a loaded spring inside the replacement assembly, and it still contains stored elastic energy. The advantage is that you do not have to release and recompress that spring on your workbench. The manufacturer has performed that operation using dedicated fixtures and controlled procedures, rather than a pair of inexpensive screw compressors in a driveway.
A bare strut is a different animal. You get the damper cartridge, or in some applications the complete damper body without the surrounding spring and mount hardware. The old spring, upper mount, bearing, isolators, boot, and bump stop remain yours to inspect and reuse. To put the new damper in service, you have to disassemble the original strut, compress and restrain the spring, remove the top nut, transfer the usable components, and reassemble the unit under spring tension.
That distinction matters because a strut is not just a shock absorber with a spring wrapped around it. The spring controls the car's ride height and much of its load-carrying behavior. The damper controls how quickly the suspension moves. The upper mount connects the assembly to the body, and on many front-drive cars its bearing allows the strut to rotate as the steering turns. A new damper does not automatically make an old mount, noisy bearing, cracked isolator, or collapsed bump stop healthy again.
| What you're working with | Loaded strut assembly | Bare strut cartridge |
|---|---|---|
| Components in the box | Usually damper, spring, top mount, bearing plate, boot, bump stop, and isolators, depending on the application | Damper or cartridge only, with the original spring and hardware reused |
| Typical parts cost per corner | Often about $150–$350, but vehicle and brand can move that range substantially | Often about $80–$200, with performance dampers sometimes costing considerably more |
| Special installation equipment | Basic hand tools, lifting equipment, and torque tools; application-specific tools may still be needed | All of the above plus a suitable spring compressor and a way to safely restrain the assembly |
| DIY labor per corner | Commonly 45–90 minutes once the old assembly is out, though rust can change the calculation | Commonly 90 minutes to several hours, depending on the assembly and the condition of the hardware |
| What happens to old components | Most of the old spring and mount hardware is removed from service | The old spring, mount, bearing, isolators, and bump stop must be judged individually |
| Best fit | Stock-height repairs on everyday vehicles, especially when several original components are worn | Performance builds, custom spring rates, selective parts replacement, or applications with a desirable original spring |
“Complete strut assembly” also needs a little caution attached to it. Catalog language is not perfectly consistent. One brand's loaded strut may include a new mount and spring; another may call a damper with a spring a complete assembly while leaving out a bearing or isolator. Read the component list for the exact part number, not just the product photograph. If the listing does not clearly say whether the upper mount, bearing, boot, and bump stop are included, assume nothing.
The same goes for left and right sides. Some assemblies are side-specific because the spring seat, brake-hose bracket, or ABS-wire tab is positioned differently. Others fit either side. A part that physically bolts in but routes the brake hose against the tire is not a successful shortcut.
The safety hazard of coil spring compression
Here's the part that doesn't fit neatly on the parts shelf. A compressed coil spring stores a large amount of energy. The force depends on the spring rate, the amount of compression, the geometry of the coil, and the vehicle application, but the practical conclusion is simple: a spring compressor is holding a component that can move violently if the tool slips, breaks, or is used incorrectly.
We don't say this to scare anyone off the work. We say it because spring-compressor accidents are not theoretical. The common clamp-style compressors with forked ends can shift on damaged, tapered, or heavily corroded coils. The hooks have to sit squarely and remain engaged as the spring changes shape during compression. If one side walks out of position, the load can become uneven before the person holding the wrench realizes what is happening.
Internal compressors are not automatically safe just because the threaded shaft is hidden inside the spring. They can be the right tool for some assemblies, but they still require correct fitment, inspection, lubrication where specified, and a clear understanding of which part is under load. An impact gun can also turn a slow, observable operation into a fast one with less opportunity to notice a binding thread or a shifting hook.
The top mount nut deserves particular respect. On many struts, it looks like an ordinary nut, but it is retaining the assembly while the spring is compressed. Removing it before the spring is safely restrained can release the spring and the mount components with serious force. The same warning applies after the nut is loosened: a spring that appears relaxed may still be carrying load because the perch, mount, or compressor is not positioned as expected.
A loaded strut avoids the spring disassembly step. It does not remove all spring-related risk from the job. The replacement assembly still contains a compressed spring, so do not cut it, clamp it in a vise, heat it, strike the spring seat, or loosen the retaining hardware because the unit “looks new.” Treat the assembly as a loaded component until it is installed and secured according to the manufacturer's instructions. During removal, the original strut may also still be under tension, particularly if the spring, mount, and damper have not separated naturally.
A loaded strut is not a spring with zero stored energy. It is a spring whose dangerous compression operation has already been completed somewhere better equipped to control it.
If the original spring is badly corroded, the spring compressor does not fit the coil correctly, or you cannot positively identify which components are carrying load, stop there. A professional shop with a proper wall-mounted or hydraulic compressor is not merely charging for convenience. It is providing equipment and a controlled procedure that most home garages do not have.
Labor time and the hidden costs of rebuilding
Let's run the numbers the way a service writer would, because that's how this decision gets justified on an estimate.
A bare strut cartridge might cost roughly $80 to $200 per corner for a conventional stock-replacement application. A loaded strut assembly for the same vehicle might run $150 to $350 per corner. Those ranges overlap across brands and vehicles, so they are useful for understanding the decision, not for predicting the exact price of your part number. At first glance, going bare appears to save $70 to $150 per side.
That math works only if the original spring and every reusable piece of hardware are genuinely reusable, and if the labor is free.
Transferring hardware onto a bare strut takes between thirty minutes and an hour per corner when everything goes smoothly. That is the optimistic version: clean fasteners, a cooperative spring, an intact bump stop, and a mount bearing that is not grinding. A vehicle that has lived through several winters can turn the same job into a fight with seized nuts, rusted spring seats, broken studs, and hardware that has to be replaced rather than transferred.
Then there is the inspection time. The spring needs to be checked for cracks and heavy corrosion, especially at the ends where it sits in the isolator. The upper mount should not be reused simply because it is still attached. Look for torn rubber, a bearing that binds or feels rough, and movement that is not present in a healthy mount. The dust boot and bump stop may be inexpensive, but they are much easier to replace while the assembly is already apart.
If the old hardware is worn, a bare cartridge can stop being the economical option. You may end up purchasing a mount kit, spring isolators, a boot, a bump stop, and replacement fasteners. At that point, the complete strut assembly is no longer competing with an $80 damper. It is competing with the total rebuild bill.
Shop labor changes the calculation even more. If a technician has to disassemble and rebuild a pair of bare struts, the labor to compress the springs and transfer the components may consume the parts savings. The exact rate varies by region and facility, but the principle is consistent: the less of the work you perform yourself, the less attractive the bare cartridge becomes as a cost-saving strategy.
| Cost line | Loaded struts, front pair | Bare struts, front pair |
|---|---|---|
| Parts | Roughly $300–$700 | Roughly $160–$400 before hardware |
| Rebuild labor | Usually none beyond installation | DIY time, or additional shop labor if the assembly is rebuilt professionally |
| Replacement mount and spring hardware | Often included, but verify the listing | Added cost if the original parts are worn |
| Professional installation | Often about $200–$400 for the pair, depending on the vehicle | Similar installation cost, plus the rebuild operation |
| Alignment after installation | Often about $100–$150, depending on the shop and vehicle | Often about $100–$150, depending on the shop and vehicle |
| What can upset the estimate | Incorrect part, missing bracket, or low-quality assembly | Rust, seized hardware, damaged spring, failed mount, or an unsuitable compressor |
The alignment line needs a more precise explanation than “struts always change everything.” On some vehicles, removing and reinstalling the strut can alter camber or caster because of slotted mounting holes, eccentric bolts, tolerances between the knuckle and strut, or changes in ride height. On other vehicles, the factory mounting arrangement limits those changes, and a careful installation may leave the angles very close to where they were.
Toe is not necessarily adjusted at the strut itself, but it can be affected indirectly if the geometry changes or if another component was already worn. A new spring can also change ride height enough to influence the alignment, particularly if the old spring had sagged. For that reason, an alignment check after front strut work is sensible. It is not because every installation automatically destroys the factory settings; it is because the cost of checking is small compared with the cost of scrubbing a new tire or driving with a steering wheel that is no longer centered.
There is also a practical timing issue. If the vehicle has worn tie-rod ends, control-arm bushings, ball joints, or wheel bearings, replacing the struts and aligning the car before addressing those parts may be wasted effort. A shop should inspect the rest of the front suspension while the vehicle is raised. A printout showing an alignment problem is not a substitute for finding the component that allows the angle to move.
When bare struts are the only choice for performance
So if loaded assemblies are simpler and often competitive on total cost, why does the bare-strut category still exist? Because stock replacement is only one use for a strut.
The first reason is performance damping. High-end units from manufacturers such as Bilstein and Koni are commonly sold as bare dampers or cartridges. Their valving, adjustment range, body design, and intended spring compatibility are part of a larger suspension system rather than a generic replacement package. A builder may want to pair a specific damper with a known spring rate, adjustable ride height, camber plates, spherical mounts, or a different bump-stop arrangement. A preassembled stock-height quick strut would remove the very choices the builder is trying to make.
A bare damper is also useful when the original spring is desirable. A well-maintained factory spring may be the correct rate for the car's weight, winter road conditions, and daily use. Replacing only the damper lets the owner retain that spring while updating the damping and replacing other worn parts selectively. This is often more attractive on a vehicle where the available loaded assemblies use a spring with an uncertain ride height or a generic calibration.
The second reason is any ride height or spring rate that is not stock. Lowering springs from Eibach, H&R, or Swift, heavier-duty springs for additional load, and lift springs for certain SUVs all require the builder to match the damper to the spring. Some suppliers do sell complete performance assemblies, coilovers, and preassembled lowering or lifting packages. They absolutely exist. But many performance combinations are still sold as separate dampers and springs because the spring rate, height, travel, and mount configuration are application-specific.
That makes the phrase “bare struts are the only option” too broad if taken literally. They are often the only practical route for a particular custom combination, but not the only form in which performance suspension is available.
What the performance choice changes
A spring is not simply a device for making the car sit lower. Lowering a vehicle changes available bump travel and droop travel. If the damper is not matched to the spring, the car may feel underdamped, crash onto the bump stops, or lose composure over a series of undulations. A stiffer spring can improve response in one situation and make the car skittish in another. A shorter spring can also unseat at full droop if the rest of the assembly was not designed for it.
Before choosing a bare performance strut, look at the whole system:
- The damper's intended spring-rate range and whether it is designed for stock, lowered, or competition use.
- The available suspension travel at the chosen ride height, including bump-stop engagement.
- The type of upper mount and bearing required for the chassis.
- Whether the brake hose and ABS-wire brackets remain correctly located after the change.
- Whether the spring is captive at full droop and properly seated at full compression.
- Whether the vehicle's alignment range is sufficient for the new ride height and intended tire wear.
- Whether the damper is adjustable, and what that adjustment actually changes rather than what the marketing copy implies.
For a commuter, these are reasons to avoid unnecessary complexity. For a track-day car or a carefully developed street build, they are the reason a complete factory-style assembly may be the wrong tool.
For everyone else — the daily driver, the commuter, the family wagon — a well-specced loaded assembly is usually the more rational repair when the springs and upper hardware are all due for replacement.
Navigating quality concerns with aftermarket assemblies
There is one more wrinkle that does not fit on the spec sheet. Cheap loaded struts are cheap for reasons, and the reasons show up in the car.
The spring is the part that varies most visibly. A reputable loaded assembly uses spring steel with a rate and free length intended for the application. A bargain-bin assembly may use a spring that changes the ride height or shifts the ride quality away from the original calibration. The difference is not always obvious on the first drive. The car may look slightly high or low at one corner, sit differently after a few weeks, or feel either too soft or too harsh over the same road.
Ride height is not just a cosmetic measurement. It influences suspension travel, alignment, steering geometry, and the way the car transfers load. A replacement that raises the front of the vehicle can alter the rake and the amount of available compression travel. A spring that settles more than expected can produce the opposite problem. Compare the installed height side to side after the vehicle has been driven and allowed to settle, but remember that fuel load, cargo, tire pressure, and an uneven surface can affect the measurement.
The damper itself matters just as much. Low-cost assemblies may use less sophisticated valving or inconsistent quality control. That does not mean every inexpensive part is defective, or that the most expensive brand is automatically correct. It means the part number should have a clear application, a usable warranty, and a reputation for maintaining the intended ride height and damping behavior. A new strut that recreates the original dive and bounce is not a bargain; it is an early repeat of the same repair.
Check the details before ordering:
- Confirm the exact engine, drivetrain, body style, and suspension package. Some vehicles use different struts for standard, sport, heavy-duty, or electronically controlled suspension.
- Verify whether the upper mount, bearing, boot, bump stop, isolator, and spring seat are actually included.
- Compare the bracket locations with the original part, especially for the brake hose and ABS sensor wire.
- Look for a stated ride-height expectation rather than assuming “stock replacement” means factory ride height.
- Buy the pair for an axle when the components are being replaced as matched units. Mixing a heavily worn original assembly with a new loaded strut can leave the damping balance different from side to side.
- Inspect the new assembly before installation for a bent rod, damaged threads, missing hardware, paint or coating trapped in a seating surface, and a spring that is not correctly positioned in its perch.
- Follow the manufacturer's instructions about bleeding, orientation, and the first movement of the damper. Some cartridges must be installed in a particular position or cycled before use.
There is also a regional angle worth mentioning. If you're working on a car that has spent its life in the Rust Belt — Ohio, Michigan, upstate New York, anywhere roads have been salted for a decade — the old strut assembly is often corroded into a single unit. The mount bolts bind in their holes. The spring rusts to the perch. The dust boot cracks and lets in moisture that damages the bump stop and the rod seal. A fastener that looks merely dirty can be close to its failure point once you put a socket and breaker bar on it.
Trying to disassemble that assembly with a spring compressor is not automatically wrong, but the condition of the components changes the risk and the labor. If the spring is deeply pitted, the perch is distorted, or the compressor cannot sit securely on the coils, the correct move is to stop and have the assembly handled with professional equipment. A loaded replacement lets you remove the old assembly as a unit and install the new one without putting a compressor on that corroded coil. In February, that is more than a minor convenience.
Long-term wear and what the car tells you later
Both formats, when chosen and installed well, can provide a long service interval. The actual life depends on road quality, vehicle weight, climate, driving style, load, and the quality of the replacement. A common expectation for conventional dampers is somewhere in the 50,000-to-100,000-mile neighborhood, but that is not a promise or a service deadline. A heavy SUV on broken pavement can wear a damper much earlier than a lightly loaded sedan on smooth roads.
A loaded strut has more new components in one part number, which can be an advantage when the old mount and spring hardware are tired. It also means more components whose quality and fitment you are trusting to the supplier. The mount bearing may become noisy before the damper fades, or the spring may settle differently from the opposite side. A bare strut lets you choose each component, but the final result depends on your inspection, assembly technique, and parts selection.
The wear pattern that actually matters is the one your tires show you. A tired strut allows more uncontrolled movement, but uneven tire wear can also come from alignment, worn control-arm bushings, loose tie rods, a bent wheel, incorrect tire pressure, or a damaged spring. Scuffing on the inside or outside shoulder is a clue, not a diagnosis. A new damper will not correct a bent knuckle or a loose ball joint.
When the new struts go in — loaded or bare — inspect the rest of the suspension, torque the fasteners at the correct ride height where the design requires it, and have the alignment checked if the application or installation could have changed the angles. Then watch the tires rather than waiting for the next vibration to explain the problem. If the wear is uneven after the repair, something else in the suspension or steering may still be moving.
There are a few signs that point toward a bad installation rather than a bad product:
1. A clunk over small bumps can come from a loose upper nut, mount hardware, sway-bar link, brake-hose bracket, or spring that is not seated in its isolator.
2. A steering wheel that no longer sits straight may indicate an alignment change, but it can also reveal a pre-existing toe problem or a component disturbed during the repair.
3. A spring that creaks while turning can point to a damaged or incorrectly positioned upper bearing, especially on a front strut that rotates with the steering.
4. One side sitting higher may be caused by the wrong spring, an incorrectly seated coil, unequal cargo or fuel load, or a worn component elsewhere.
5. A continuing float or repeated bounce suggests that the damper is not controlling the spring properly, although tire pressure and other suspension faults should be checked before condemning the part.
So, are quick struts worth it? For a stock-height daily driver, often yes — particularly when the original spring, mount, boot, and bump stop are all old, the vehicle has significant corrosion, or the work is being done at shop rates. The additional purchase price buys more than a few minutes. It buys a known assembly, fewer opportunities to damage a spring or mount during rebuilding, and a simpler installation path.
A bare strut makes more sense when the original spring is in good condition, the upper hardware is worth keeping, the owner is doing the labor, or the vehicle needs a specific performance combination. It can be the better technical choice, but it is not automatically the cheaper one.
You don't really choose between a loaded strut and a bare strut. You choose between a controlled repair and a component-by-component build. Know which job is in front of you before you price the first part.