Rubberized undercoating: is the rust risk worth it?
Rubberized undercoating rust risk begins with a simple physical problem: a thick black coating can hide what is happening underneath it. When the surface is clean and properly prepared, the material forms a barrier against water, road salt, and stone impact.
Judson Grier·Updated: August 16, 2026·17 min read
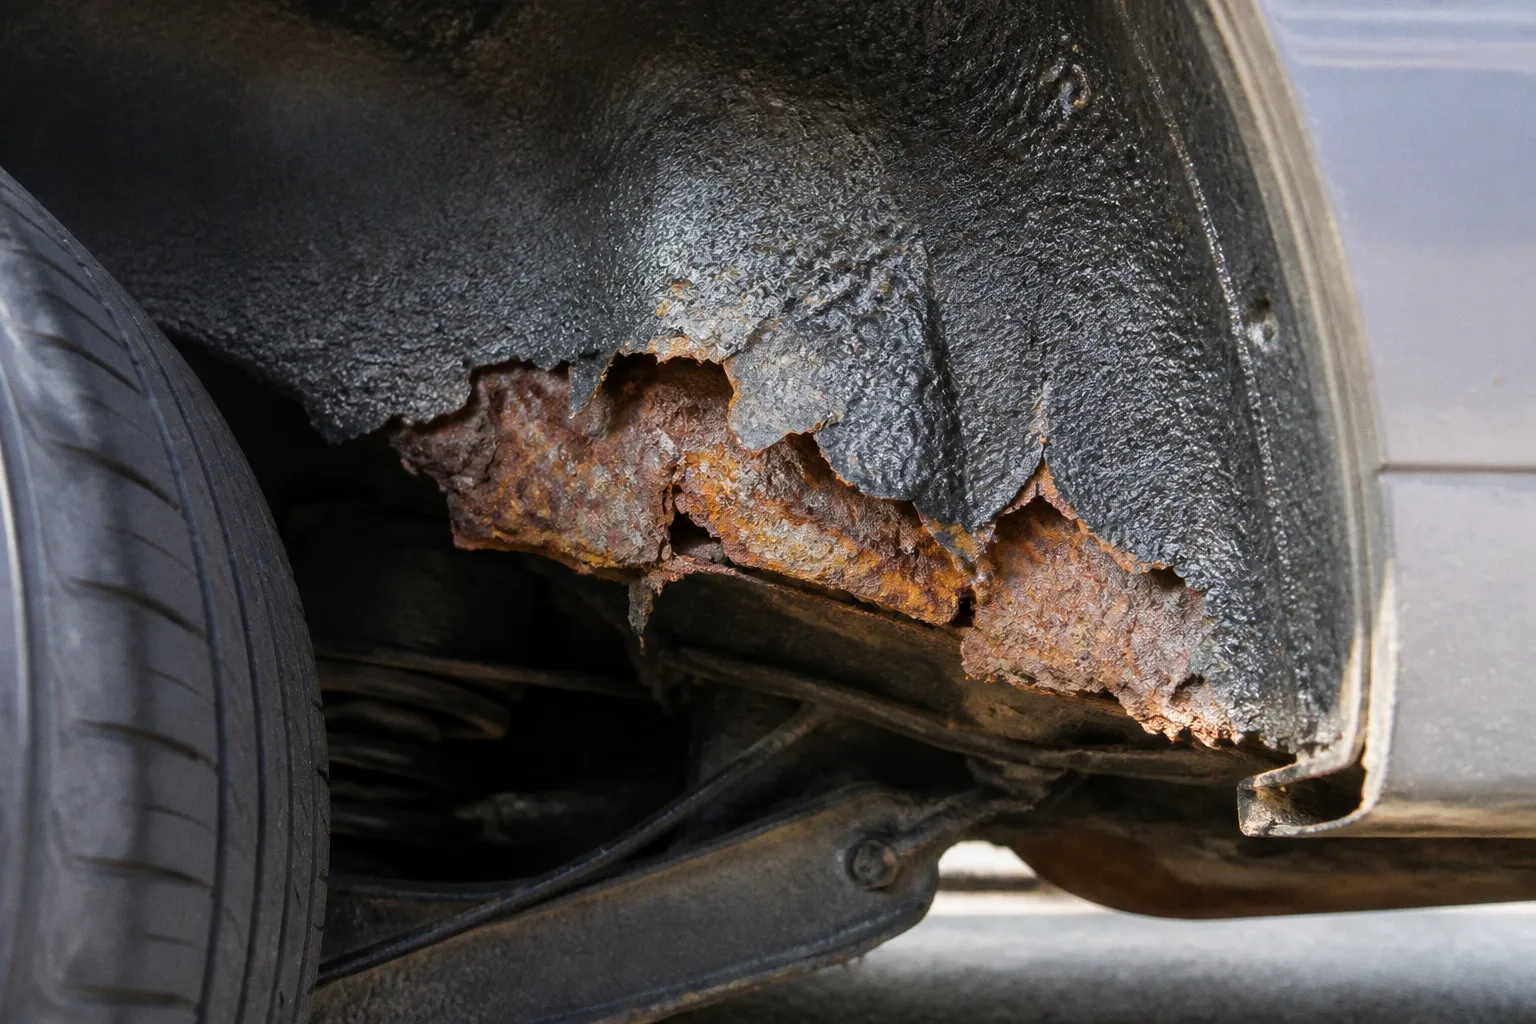
When it is sprayed over scale rust, damp seams, or old flaking underseal, it can seal the evidence in place while corrosion continues beneath the shell.
That is why the answer to does rubberized undercoating cause rust is neither a clean yes nor a clean no. The material does not create oxidation by itself. Poor preparation, hidden moisture, cracking, and neglected inspection create the conditions. Rubberized coating can then make those conditions difficult to see and harder to correct.
We need to look at the underbody as a working structure rather than a blank surface. It flexes, heats, cools, collects salt, drains water, and takes repeated impacts from gravel. Any protection that ignores those forces eventually shears, binds, cracks, or lifts from the metal.
What rubberized undercoating is supposed to do
Rubberized undercoating dries into a thick, relatively rigid film. Its job is to separate vulnerable metal from three persistent sources of damage:
- Water and condensation that sit on seams, brackets, and folded sections.
- Road salt that lowers the threshold for corrosion and remains active in damp deposits.
- Gravel and road debris that chip paint and expose bare steel.
On a clean floor pan or properly prepared frame section, that barrier can be useful. It absorbs some impact, reduces direct exposure to spray, and gives painted or treated metal another layer of protection. It is especially suited to areas where stone strike is a greater concern than constant movement: wheel wells, exposed floor sections, and certain rigid frame surfaces.
But the coating is not a rust repair. It has no meaningful ability to remove scale, neutralize deep corrosion, dry trapped water, or rebuild metal that has already thinned. The thick film only covers the condition we leave underneath.
This is where many applications go wrong. The underside looks better immediately after spraying because the old brown, gray, and flaky surfaces disappear beneath a uniform black finish. That visual improvement is not the same as structural protection. A smooth surface may simply be a concealed problem.
Rubberized undercoating protects prepared metal. It does not turn corroded metal into prepared metal.
The other limitation is movement. A vehicle’s underside does not remain at one temperature or in one shape. A floor pan warms from the cabin and exhaust system, then cools in freezing air. Suspension mounts load and unload. Frame sections flex slightly. The coating expands and contracts with those changes, but not indefinitely.
During freeze-thaw cycles, a hard rubberized shell can develop cracks. Rock impacts can chip it. Once a fissure opens, water and salt can enter through the top while the thick material prevents them from draining easily. The visible damage may be a small split; the concealed damage can spread across a seam or flange.
How the rust risk develops underneath the coating
Corrosion needs access to moisture and oxygen, and road salt makes the process more aggressive. Underbody rust often starts in places that are difficult to dry completely: lap joints, spot-welded seams, drain channels, subframe pockets, suspension brackets, and areas where two panels touch.
If rubberized undercoating is applied over these areas while they are damp or already oxidizing, the coating changes the inspection problem. Instead of seeing rust develop on an exposed surface, we now have a sealed cavity or covered seam. Moisture can remain against the metal, especially where the coating bridges an irregular surface without bonding fully at every edge.
The coating may remain attached around the perimeter while lifting in the center. From below, it can still look solid. A probe, inspection mirror, or careful scrape may reveal a soft pocket beneath it. In other cases, the shell cracks along a seam and lets in saltwater repeatedly. The opening is too small to flush the contamination out, but large enough to keep feeding it.
This is the central rubberized undercoating rust risk: concealment combined with water retention.
We should also distinguish surface rust from deeper corrosion. Light oxidation on a sound, cleanable surface can often be mechanically removed or stabilized before a protective coating is applied. Flaking scale, swollen seams, perforation, and layered rust require a different decision. Coating over them may preserve the appearance while the metal loses thickness.
A practical inspection should focus on:
- Whether the surface is solid when lightly probed, not merely black and smooth.
- Whether rust scale has been removed from seams, brackets, and folded edges.
- Whether drain holes and factory passages remain open.
- Whether the coating is bonded or lifting at its edges.
- Whether there are cracks, bubbles, soft areas, and places where salt has collected.
- Whether the vehicle has been washed and fully dried before application.
The last point is easy to underestimate. An underbody can appear dry while holding water inside seams, behind plastic shields, or above subframe plates. Spraying a barrier over that moisture does not make it disappear.
Preparation determines the result more than the product
The application process starts before the can or spray gun is opened. We need access, lighting, cleaning equipment, and enough time to let the underside dry. A rushed coating job is usually a rushed inspection as well.
First, the vehicle needs to be safely supported. A jack alone is not a working platform. We need stable stands or a lift, with the suspension and underbody accessible enough to inspect the areas that will actually be coated. Remove shields where necessary, but do not treat every plastic panel as something that must come off. The goal is to see the metal, seams, mounts, drain points, and lines that matter.
Then remove dirt, salt, and loose old material. A pressure washer can clean heavily contaminated areas, but it also drives water into seams and connectors if used carelessly. After washing, the vehicle needs a genuine drying period. Compressed air helps move water from pockets, but it does not replace time.
Mechanical preparation is the dividing line between a protective job and cosmetic coverage. Loose scale must be removed. Flaking paint and detached old underseal must be cut back to material that is actually bonded. Edges should not be left as curled lips beneath which water can travel.
The metal does not have to look polished, but it must be understood. If a bracket has lost section, if a seam is opening, or if a frame rail is deeply pitted, the correct next step may be repair rather than coating. No underbody product can restore missing steel.
For a sound surface, the sequence generally looks like this:
1. Inspect before washing. Note existing rust, oil leaks, damaged shields, open seams, and factory coating failures. Wet dirt can hide problems that become obvious only after cleaning.
2. Clean the underside. Remove salt and road film from the areas to be treated, paying attention to wheel wells, pinch welds, subframes, and the rear edges of floor panels.
3. Dry the vehicle completely. Blow out seams and pockets, then allow enough time for residual moisture to leave folded metal and shielded areas.
4. Remove loose corrosion and old coating. Use suitable brushes, scrapers, or abrasive tools without thinning sound metal around the repair.
5. Treat and prime only as required by the coating system. Some products are intended for bare or painted metal; others require a specific primer. Mixing systems without checking compatibility can produce peeling or softening.
6. Mask everything that must remain clean and functional. Brakes, exhaust components, sensors, electrical connectors, rubber boots, drain holes, and service points are not overspray targets.
7. Apply thin, even passes. A heavy coat can skin over while remaining soft underneath, and it makes future inspection more difficult.
8. Inspect the finished surface after curing. Look for missed seams, blocked passages, runs, trapped debris, and contact with components that should not be coated.
This is slower than spraying the entire underside from one direction. That is also why professional application of oil- or lanolin-based coatings commonly costs around $200–$400: much of the work is access, cleaning, masking, and inspection rather than the material itself.
Where rubberized coating should never be sprayed
Undercoating is not a general-purpose black paint for everything below the vehicle. Several components must remain free of the material because their function depends on heat transfer, friction, sensing, or movement.
Exhaust and other high-heat components
Exhaust pipes, mufflers, catalytic converters, and nearby heat shields operate at temperatures that ordinary rubberized undercoating is not designed to tolerate. Spraying these parts can produce burning smells, smoke, or a fire hazard. It can also interfere with heat dissipation and leave a residue that is difficult to diagnose later.
The same caution applies to components near the exhaust. A coating may be sprayed onto the floor pan while the exhaust is still warm or close enough that overspray reaches it. Masking needs to follow the actual spray pattern, not just the visible outline of the part.
Oil pans also deserve caution. They may seem like convenient bare metal targets, but heat exposure, service access, and the risk of hiding leaks make them poor places for an improvised undercoating layer. Unless a product is specifically designed and rated for that location, we leave it alone.
Brakes and wheel-end hardware
Rotors and pads depend on clean friction surfaces. Calipers need to move correctly, shed heat, and remain serviceable. Overspray can contaminate braking surfaces, interfere with heat dissipation, and contribute to uneven pad wear.
The correct approach is not to coat around the brakes and hope for the best. We mask the rotor, pad, caliper, bleeder, hose connections, and nearby moving hardware. If material lands on a friction surface, the vehicle should not simply be driven to see whether it wears off. The contamination needs to be removed properly.
Sensors, connectors, and wiring
Modern import vehicles place wheel-speed sensors, oxygen sensors, harness clips, and electrical connectors close to the areas being treated. Undercoating can cover a connector seal, stiffen a wire, block a sensor target, or make a future diagnostic inspection unnecessarily difficult.
An application that triggers ABS or check-engine warnings may not have damaged the sensor directly. It may have contaminated a connector, pulled on a harness, or blocked the signal path. Either way, the coating has turned a maintenance job into a diagnostic problem.
Drain holes, seams, and service points
The underside needs to drain. Factory drain holes, body plugs, access points, and seam paths should not be filled simply because they look like gaps. Blocking drainage can hold water inside a rocker panel, door section, frame cavity, or floor channel.
We also need to keep fasteners and inspection points usable. A thick film around a bolt head may look harmless until the next suspension repair, when the coating tears away with the tool and exposes bare metal around the joint.
Rubberized undercoating versus oil and wax products
The comparison between rubberized undercoating and oil wax is not really about which product is universally better. They behave differently because they solve different parts of the corrosion problem.
There are five broad categories commonly encountered in underbody protection:
- Rubberized coatings.
- Asphalt-based coatings.
- Oil-based inhibitors.
- Polyurethane coatings.
- Wax-based products.
The names overlap between brands, so the label alone does not tell us how a product will behave. The useful question is whether the film is rigid or fluid, thick or penetrating, easy or difficult to inspect, and how it responds to scratches and movement.
| Property | Rubberized undercoating | Oil- or lanolin-based inhibitor |
|---|---|---|
| Main protection | Thick barrier against spray and stone impact | Moisture displacement and corrosion inhibition |
| Behavior after scratching | Can leave a crack or exposed edge that admits water | Remains mobile and can flow back over minor damage |
| Interaction with rust | Requires clean, prepared metal; can trap moisture over rust | Can penetrate seams and displace moisture from damp areas |
| Inspection | Hides the surface once cured | Leaves the metal and coating condition easier to reassess |
| Movement | May crack or chip as the body flexes and temperatures change | Flexes and remains fluid with vehicle movement |
| Maintenance | May require scraping or patching when damaged | Usually needs periodic reapplication |
| Best use | Prepared, relatively rigid surfaces needing impact resistance | Seams, cavities, joints, and areas where self-healing matters |
Oil-based rust inhibitors remain fluid, displace moisture, and move with the vehicle. When road debris scratches the film, the material can spread back across the damaged area rather than leaving a hard fissure. That does not make the car immune to rust, but it reduces the problem of a rigid shell failing at one small impact point.
The trade-off is mess and maintenance. Fluid products can attract dust, remain tacky, and require reapplication. They are not always pleasant around a driveway or workshop floor. They also do not provide the same stone-impact barrier as a thick rubberized coating.
For many older vehicles, especially those with existing seams, cavities, and mixed factory coatings, a creeping inhibitor is the safer corrosion strategy. For a clean, prepared panel that receives repeated gravel impact, a properly applied barrier coating can still have a place. The two approaches are not necessarily enemies; they simply should not be applied blindly on top of one another.
A rigid rubberized layer over an active oil film may not bond correctly. An oil treatment sprayed into a thick, cracked undercoat may not reach the steel beneath. We need to know what is already on the vehicle before adding another layer.
The best corrosion coating is the one we can inspect, renew, and remove when the metal underneath changes.
The parts of an import that deserve closer attention
European and Asian vehicles often arrive with different factory underbody treatments, road histories, and repair standards. A car imported from a salted climate may look clean from the side while carrying corrosion in the places that are difficult to photograph: subframe pockets, pinch welds, rear suspension mounts, brake line clips, and seams behind shields.
The inspection should follow the vehicle’s construction rather than the product advertisement.
Subframes and suspension mounts
Subframes collect spray and salt, particularly around bush mounts and boxed sections. Rubberized coating can make a weakened mount look uniform and solid. We need to look for swelling, layered scale, perforation, and cracks radiating from loaded mounting points.
Do not confuse a surface finish with remaining thickness. If a probe penetrates a rust pocket or the mount moves independently of the surrounding metal, the issue belongs in mechanical repair.
Rocker panels and pinch welds
The lower edges of rocker panels are exposed to direct spray from the front tires. Pinch welds also become lifting points when a vehicle is jacked incorrectly. Coating can conceal crushed metal, previous repairs, and rust that has started between folded layers.
Drainage matters here. A coating that bridges the lower seam or covers a drain opening may hold water inside the rocker rather than keeping it out.
Brake and fuel lines
Lines are often clipped against the body where dirt remains damp. Coating may protect a sound line from splash, but it can also hide surface deterioration and make future inspection harder. We should never use a black coating to make corroded tubing look acceptable.
The same logic applies to fuel tank straps, clips, and fasteners. If the strap is flaking or thin, it needs evaluation before anything is sprayed over it.
Wheel wells and inner fenders
These areas receive the most direct impact from gravel and wet debris. They can benefit from a durable protective layer when the surface is solid and clean. But the wheel well also contains ABS wiring, wheel-speed sensors, brake hoses, suspension joints, and fasteners. Masking is not optional.
On vehicles with plastic liners, removing the liner can reveal rust at the edges and behind the mounting points. Leaving it in place may save time, but it also leaves a blind area. We make that decision based on access and inspection, not convenience.
When rubberized undercoating is worth it
Is rubberized undercoating worth it? Sometimes, but only when the vehicle and the surface match the product.
It makes the most sense when:
- The metal is sound, clean, and dry.
- The area is relatively rigid and exposed to stone impact.
- The coating can be applied without blocking drainage or covering service components.
- The vehicle owner is willing to inspect the film periodically.
- The existing factory coating is bonded and compatible with the new material.
- The underbody has been repaired first rather than cosmetically concealed.
It is a poor choice when:
- Rust scale is active or the metal is already perforated.
- The vehicle has numerous damp seams and cavities that need a penetrating treatment.
- The underside cannot be cleaned and dried thoroughly.
- The coating will be applied over oil, road salt, loose paint, or failing old underseal.
- The owner wants a permanent treatment that never needs inspection.
- There is a serious concern about future rust diagnosis and access to the metal.
The phrase permanent rust protection causes trouble because it encourages us to stop looking. Every underbody treatment ages. Some products crack; some wash away; some collect dirt; some become brittle; some remain soft and need renewal. Protection is a maintenance layer, not an exemption from maintenance.
For a daily-driven vehicle in a salted region, a yearly inspection is more valuable than a dramatic one-time spray. We look for new cracks, lifted edges, exposed metal, wet pockets, and corrosion at fasteners. If the coating has failed in one area, we do not simply spray over the failure. We cut back the damaged section, identify why it failed, dry and prepare the metal, then repair the protection.
A sensible decision before the spray gun comes out
Before choosing a product, answer four mechanical questions.
What condition is the metal in?
Clean steel, painted steel, light surface oxidation, deep scale, and perforated metal are separate situations. The product choice cannot correct a wrong diagnosis.
Where does the vehicle flex, heat, and drain?
Rigid floor sections are not the same as suspension mounts. A cool wheel-well panel is not the same as an area beside the catalytic converter. A visible seam may also be a drainage path.
Can we inspect the coating after it is applied?
If the material will hide the exact areas we need to monitor, we need a maintenance plan and an application that leaves critical edges and service points accessible.
What happens when the coating is damaged?
A fluid inhibitor can often be renewed over a scratch. A rigid shell may need to be scraped back and repaired. If nobody is prepared to do that work, the coating becomes a liability.
This is also where product claims deserve restraint. A product can resist salt and water without preventing every form of corrosion. It can be durable without remaining intact after years of impacts. It can be useful on prepared metal and harmful over active rust. Those statements are not contradictory; they describe the material’s limits.
Final assessment
Rubberized undercoating is not automatically a rust trap, and it is not a cure-all. Applied over clean, dry, properly prepared metal, it can provide a useful barrier against moisture, salt, and road debris. Applied over existing rust or damp contamination, it can seal the problem beneath a hard shell and make the next inspection much harder.
For many underbodies, especially those with seams and cavities, oil- or lanolin-based rust inhibitors offer a more forgiving approach because they displace moisture, remain flexible, and can self-heal after minor scratches. They require more frequent attention and are less tidy, but that inconvenience is visible. Hidden corrosion is not.
The long-term choice comes down to how we expect the vehicle to age. A coating that looks perfect on the day of application is only the first condition. The better protection is the one that continues to let us see the metal, reach the service points, and repair damage before a small crack becomes a structural problem.