Cracked Leather Seats: Restoration Guide for Import Cars
Cracked leather on an import-car seat rarely starts as a dramatic split. More often, the finish loses its flexibility first, the outer pigment breaks along the places that receive the most pressure…
Aldous Moorland·Updated: August 06, 2026·21 min read
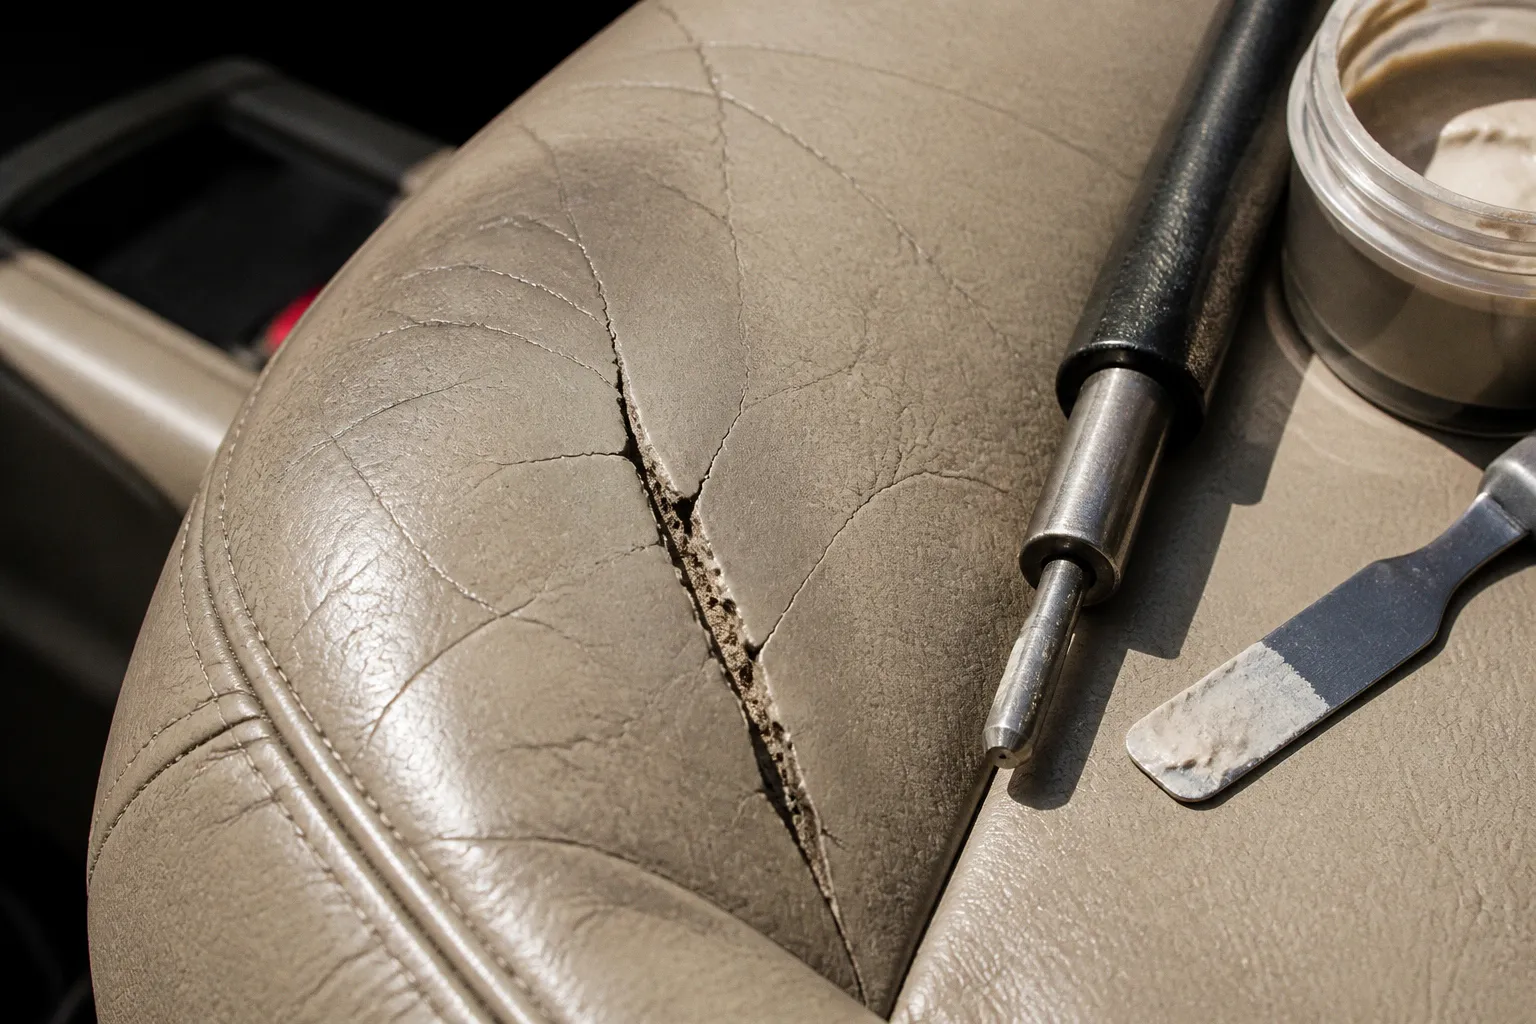
Cracked leather on an import-car seat rarely starts as a dramatic split. More often, the finish loses its flexibility first, the outer pigment breaks along the places that receive the most pressure, and the pale or darker material beneath begins to show through. The driver’s bolster is usually the first victim because it takes repeated contact every time someone gets in and out.
That does not automatically mean the seat needs to be reupholstered. Many damaged bolsters can be restored at home, provided the repair is treated as more than a quick application of dye. Cleaning, removing loose material, reinforcing weak fibers, filling the damaged surface, matching the color, and protecting the finished repair all matter. Miss one of those stages and the result may look acceptable for a week while remaining structurally weak underneath.
The right approach to cracked leather seat restoration is therefore conditional rather than automatic. The product system must match the upholstery, the damage must be stable enough to repair, and every drying or curing interval should follow the instructions supplied with the particular binder, filler, pigment, or topcoat.
A leather repair is only as strong as the surface beneath it. Paint can hide a crack; it cannot make loose fibers hold together.
Identifying Your Upholstery: Genuine Leather vs. Synthetic Alternatives
The first question is not which color to buy. It is what the seat is made from.
Import manufacturers use several types of upholstery, and marketing names do not always make the distinction obvious. A vehicle may have genuine leather on the seating surfaces, synthetic material on the side panels, or a coated leather construction that behaves differently from uncoated hide. Mercedes-Benz MB-Tex, BMW Sensatec, and Lexus NuLuxe are examples of synthetic upholstery systems, while other trims combine leather seating faces with vinyl or polyurethane-coated sections elsewhere in the cabin.
These materials are not simply better or worse versions of the same thing. They have different surfaces, different flexibility, and different requirements for adhesion.
Where to inspect
Look for an exposed edge rather than cutting into a visible section of the seat. Useful locations include:
- The underside of a removable seat cover, if access is available.
- A seam allowance hidden beneath the seat.
- The edge of a panel near the seat rail.
- The back or lower side of a bolster where the finish is already damaged.
- A loose flap of material at the edge of an existing repair.
The reverse side of genuine leather commonly shows a fibrous, suede-like structure. Synthetic upholstery usually has a fabric backing, mesh, or a relatively uniform polymer layer. That distinction is more useful than trying to identify the material by smell or temperature. A brief look at the cross-section is not conclusive in every case, but it is a better starting point than relying on the trim name alone.
| What you see | More consistent with genuine leather | More consistent with synthetic upholstery |
|---|---|---|
| Reverse side | Irregular, fibrous surface | Woven fabric, mesh, or smooth backing |
| Edge structure | Natural-looking fiber layers | More uniform coated layer |
| Damage pattern | Finish may crack while the hide remains fibrous beneath | Coating may split, peel, or expose the backing |
| Repair products | Leather binder, flexible filler, leather pigment | Vinyl or synthetic-leather repair compound |
| Main risk | Over-sanding the hide or making the repair rigid | Poor adhesion to a flexible polymer surface |
If the material is synthetic, do not assume that a product labeled “leather repair” is automatically suitable. Some repair systems are designed for both leather and vinyl, while others are formulated for one substrate only. Read the manufacturer’s technical notes and test the product in a hidden area. A synthetic surface may accept a compatible flexible compound very well, but a product intended for absorbent leather can fail to grip it properly.
The reverse is also true: a vinyl compound is not necessarily the right choice for a genuine leather bolster. The chemistry is not a minor detail. It determines whether the repair flexes with the seat or forms a separate patch that eventually lifts around the edges.
Condition also matters. A surface with shallow finish cracking and firm material underneath is a different job from a bolster where the coating has peeled away, the fibers have torn, or the seat foam has collapsed. If the material is split through, the seam is pulling apart, or the cushion has lost its shape, a surface repair may improve appearance without solving the underlying problem.
Surface Preparation: The Critical Role of Degreasing and Sanding
Most failed DIY leather repairs are not ruined by an expensive mistake in the color coat. They fail earlier, when the repair is applied over silicone, body oil, dressing residue, dust, or loose pigment.
A driver’s bolster is exposed to clothing, skin, hand cream, cleaning products, and the repeated friction of entering the vehicle. Even a seat that looks clean may carry an invisible film. That film can prevent binder or filler from wetting the surface evenly.
Degreasing without damaging the finish
Use a cleaner or preparation solvent that is approved for the material and the repair system. Some products are intended for coated automotive leather; others are stronger and may soften or strip the existing finish. Isopropyl alcohol is used by some repair systems, but its suitability depends on the coating, concentration, and product instructions. Do not treat one solvent as universally safe.
A sensible preparation sequence is:
1. Vacuum the seat and surrounding seams so grit does not become part of the repair.
2. Clean the entire panel, not only the visible crack. Dirt around the damaged area can be pushed into the repair as you work.
3. Apply the recommended degreaser to a cloth rather than flooding the seat.
4. Wipe gently until the cloth stops picking up residue.
5. Allow the surface to dry completely according to the product instructions.
6. Test the cleaner in a concealed area before continuing on the visible bolster.
The goal is a clean, stable surface, not a stripped and bleached one. If the original color comes off aggressively during cleaning, stop and reassess. You may be dealing with a failing topcoat rather than a simple crack, and more solvent will only enlarge the problem.
A second cleaning pass can be useful where the seat has a heavy dressing buildup, but it should be guided by what the product label permits. Stronger is not automatically better. Excess solvent can affect the existing pigment or leave the surface too soft for the next layer.
Sanding the damaged finish
Sanding removes loose edges and gives the repair material a surface it can grip. It is not an instruction to sand through the entire colored coating.
Start with the least aggressive abrasive that removes the failing finish. Fine automotive abrasive paper or a dedicated leather-repair abrasive is usually easier to control than a power sander. Work by hand around stitching, piping, perforations, and transitions into undamaged leather.
Pay attention to the feel of the surface:
- If the edge of the crack catches on a fingernail, it may need careful leveling.
- If the finish turns into powder, remove the loose material but avoid widening the area unnecessarily.
- If the leather fibers become fuzzy, stop using coarse abrasive and move to a gentler approach.
- If the backing or a different-colored layer appears, the sanding has gone too far for that spot.
The exact abrasive grade depends on the repair compound and the condition of the seat. A repair kit may recommend one grade for removing loose coating and another for smoothing cured filler. Follow that system instead of treating a grit number as a universal rule.
After sanding, remove dust with a soft brush or vacuum and wipe with the preparation product recommended for the system. Do not leave sanding residue under the binder. Small particles can create bumps that become much more visible after the pigment is applied.
Structural Reinforcement: Applying Leather Binder to Worn Fibers
A crack is sometimes only a break in the finish. In other cases, the underlying leather has become dry, thin, or mechanically weak. Filler cannot compensate for loose fibers. It can level a depression, but it does not turn unstable material into a sound substrate.
Leather binder is used to consolidate worn fibers and provide a more coherent base for flexible filler. On synthetic upholstery, use the compatible adhesion promoter or repair compound specified for that material instead of assuming a leather binder will behave the same way.
How to judge the condition
Press the area lightly with a fingertip and compare it with an undamaged section of the same panel. You are looking for differences in support and recovery, not trying to apply a universal time-based test.
- A firm surface with a clean, narrow finish crack may need little or no structural binder.
- A slightly soft area with frayed edges may benefit from several thin applications.
- A section that feels hollow, collapses easily, or moves independently from the surrounding upholstery may have deeper damage.
- If the foam, stitching, or seam is failing, surface products will not restore the seat’s original structure.
The more the damaged material differs from the surrounding panel, the less likely a purely cosmetic treatment is to last.
Applying the binder
Use a small, fine-pored sponge or the applicator supplied with the product. Apply thin coats over the weakened area, allowing each coat to dry as directed. Keep the binder within the damaged zone where possible, but feather the edges so there is no abrupt ridge between treated and untreated material.
Several light coats generally give better control than one heavy application. A thick wet layer can remain soft underneath, collect texture from the applicator, or make the repair noticeably stiffer than the surrounding leather.
Do not judge readiness by the clock alone. Temperature, humidity, coat thickness, ventilation, and the formulation all change the drying time. The surface should be dry and stable before filler is introduced. If it still feels tacky or cool and soft under light pressure, give it more time.
Binder is reinforcement, not a substitute for missing leather. If the seat is torn through or the seam has separated, the repair has moved beyond a simple surface restoration.
Binder may be enough when the material is worn but there is no meaningful depression to level. In that situation, adding filler simply adds stiffness and can make the repair more obvious. Conversely, a deep or mobile defect may need reinforcement and a flexible filler, and possibly a backing repair, before color is considered.
Filling and Leveling: Techniques for Smooth Bolster Repairs
Flexible leather filler is used to replace missing surface material and level the transition between the damaged section and the original finish. It should be applied sparingly. The aim is to recreate the contour of the bolster, not to bury the entire panel under a thick plastic-like layer.
Working the filler into the crack
Use a flexible palette knife, plastic spreader, or the tool recommended by the kit. Press the filler into the damaged line so it reaches the bottom of the defect, then remove the excess from the surrounding surface.
The first application should be thin enough to cure properly. If the crack is deep, build it in multiple applications rather than trying to fill it in one pass. Thin layers reduce shrinkage, make sanding easier, and allow you to see whether the underlying damage is moving.
Let the filler cure according to the product instructions before sanding. Room temperature, airflow, humidity, and the thickness of the application all matter. A surface that feels dry may still be soft beneath the skin. Sanding too early can pull filler out of the crack or smear it across the original grain.
A typical sequence looks like this:
1. Press a small amount of filler into the open crack or depression.
2. Scrape the surface nearly level with the surrounding material.
3. Allow the layer to cure fully enough for the product to be sanded.
4. Sand only the high spots and feather the edge.
5. Remove dust and inspect under angled light.
6. Add another thin layer where the depression or fracture remains visible.
7. Repeat until the transition is smooth without creating a hard raised patch.
The appropriate filler depth is product-specific and damage-specific. If the repair requires a substantial build-up, the seat may have lost more material than a flexible surface compound is meant to replace. A thick rigid mass will not move like the original upholstery, especially on a bolster that bends every time the driver enters the car.
Preserving the bolster shape
Bolsters have a designed profile. It is easy to flatten the high point while chasing a perfectly smooth finish, especially when sanding by hand. Before applying filler, study the matching bolster on the passenger side or an undamaged section of the same seat. Use it as a visual reference for the curve, not as a reason to copy every texture mark.
A thin foam sanding pad is useful on curved areas because it follows the contour more evenly than a hard block. Keep the surrounding surface protected with masking tape, but do not press the tape into a still-soft repair. Remove it carefully before the product fully locks it in place.
Do not use high heat to force the process. Some manufacturers permit gentle warm air for particular fillers, but the product label should define the temperature and method. Excess heat can skin the surface, soften the existing coating, distort synthetic upholstery, or create a repair that appears cured while remaining weak underneath.
When a crack keeps reopening
If the same line returns after the filler has cured, the problem may not be the filler. The underlying material may still be moving, the seat foam may be damaged, or the crack may extend beyond the area that was treated. Sanding and repainting the surface again will not correct that movement.
At that point, inspect the seam, the edge of the panel, and the cushion beneath it. A professional trimmer may need to stitch, patch, or replace part of the upholstery. DIY filler works best when the substrate is damaged but still continuous.
Color Matching and Finishing: Applying Pigment and Protective Topcoats
Automotive seat color is usually carried by a pigmented coating system rather than a penetrating furniture-style dye. That is why a color product intended for saddlery or aniline leather may produce the wrong appearance or fail to bond to a coated automotive surface.
A good repair does not only match the broad color family. It also matches the level of sheen, surface texture, and amount of color variation visible in the original panel.
Finding the correct color
Start with the vehicle’s trim information, but verify it against the actual seat. Interior colors can vary with model year, market, replacement upholstery, fading, and previous repairs. Names such as black, tan, oyster, cognac, or mocha are useful starting points, not guarantees of an exact match.
Possible sources include:
- The vehicle data plate or interior trim label.
- Manufacturer service documentation.
- A reputable automotive leather-repair supplier.
- A physical color swatch compared with a clean, shaded section of the seat.
If the original code is unavailable or the seat has faded, order or mix a close sample and test it somewhere hidden. The underside of the bolster or an area behind a trim panel is more useful than testing directly on the visible repair. Let the sample dry and receive its topcoat before judging it; wet pigment and uncured topcoat can look noticeably different from the final finish.
Color should be assessed in neutral daylight or another consistent light source. A warm garage lamp can make a neutral gray look brown, while a cool LED can exaggerate blue tones. If the repair is being blended into a large panel, make several small samples rather than changing the whole mix after one quick glance.
Applying the pigment
Before pigment is applied, make sure the filler is smooth, dust-free, and fully ready for the next product. Lightly wipe the area with the approved preparation product if the system calls for it.
Apply the pigment in thin, controlled coats with an airbrush, spray system, or dense foam applicator suited to the product. Do not flood the filled crack. Heavy application can obscure texture, create a glossy patch, and leave the center of the repair softer than the edge.
Allow each coat to dry as specified. The number of coats depends on the opacity of the pigment, the color contrast of the repair, and the application method. Stop when coverage is even rather than automatically applying a predetermined number of passes.
Feathering is also product-specific. A small spot repair may need the pigment blended beyond the filler edge, while a heavily faded panel may require a broader color transition. Keep the blend controlled: an unnecessarily large painted area can be more difficult to match than the original defect.
Restoring the surface feel
A factory seat rarely has a perfectly flat, glass-like finish. It may have a fine grain, slight variation in sheen, or a soft matte feel. A repair that is visually close but too smooth can still be obvious when touched.
Some kits include grain paper or texture products, but these must be used while the filler is at the correct stage of cure. If the filler is too soft, the pattern collapses; if it is too hard, the texture will not transfer cleanly. Practice on a scrap or hidden section before attempting the visible bolster.
Do not try to recreate deep grain with aggressive sanding or thick topcoat. Texture should remain subtle and consistent with the surrounding upholstery.
Applying the protective topcoat
The topcoat is the wear layer that protects the pigment from friction, skin contact, and routine cleaning. Choose the gloss level that matches the original seat. Many automotive interiors are closer to satin or matte than to a bright gloss, but the correct finish varies by material and model.
Apply light coats at the intervals specified by the manufacturer. Keep the seat protected from dust while it cures, and do not return it to heavy use merely because the surface feels dry. Full cure can take longer than the initial dry time, particularly in a cool or humid garage.
The finished surface should be checked for:
- A consistent sheen from the repair into the surrounding panel.
- No tackiness when touched lightly.
- No raised edge where filler meets original material.
- No pigment transfer onto a clean cloth after the product has cured as directed.
- Flexibility that is reasonably similar to the surrounding upholstery.
If the topcoat dries too glossy, do not immediately sand through it and start again. Confirm that the product has fully cured and that the sheen is actually different from the factory finish. A compatible matte or satin layer may correct the appearance, but only if the repair system allows it.
Restoring Perforated Leather: Maintaining Airflow and Texture
Perforated upholstery requires more planning because the holes are part of the surface pattern and, in some seat designs, part of the ventilation system. They are primarily associated with ventilated seating and airflow through the seat surface. They are not openings intended to make heated elements “breathe.”
Filler and pigment can close the perforations, especially when the damage is on a ventilated seating panel. Blocked holes may reduce airflow and will also make the repair visibly different from the surrounding material.
Before applying filler, photograph the undamaged perforation pattern from directly above. A piece of masking tape placed beside the repair can also serve as a reference for spacing and alignment. The pattern may run in rows, stagger across the panel, or change direction near a seam, so do not assume that every area uses the same layout.
Apply filler carefully and avoid spreading it farther than necessary. Once the filler has reached the working stage recommended by the product, reopen each hole with a suitable fine pick, needle, or hand tool. Work slowly and keep the openings aligned with the original pattern. A power drill is difficult to control at this scale and can tear the surrounding filler or enlarge the holes.
If the filler has already cured, a manual tool is generally safer than forcing a drill through the repair. The objective is to clear the opening, not to carve a new, oversized perforation. Clean debris from the holes before pigment is applied.
Pigment should also be applied in light coats. Heavy spray or excess liquid can bridge the holes again. After the color and topcoat have cured, inspect the repaired panel from both sides if possible. Confirm that the perforations are open and that the repair has not sealed the airflow path.
For ventilated seats, a poor repair can affect function as well as appearance. If a large section of the panel is damaged or the perforations are badly distorted, replacing the upholstery panel may be more reliable than trying to recreate every opening by hand.
Deciding Whether a DIY Repair Is the Right Repair
A leather repair kit for import cars is useful when the damage is localized and the upholstery remains attached and reasonably stable. It is less suitable when the damage is structural.
DIY restoration is a reasonable candidate when:
- The crack is confined to the surface or a small area of the bolster.
- The surrounding material is still flexible and attached.
- The seat foam and seams retain their shape.
- There is enough original material around the defect to blend the repair.
- You can test the products in a hidden area before committing to the visible panel.
Professional help becomes more sensible when:
- The upholstery is torn through rather than merely cracked.
- The seam, piping, or stitching is separating.
- The foam has collapsed or is visible beneath the cover.
- A large panel is peeling or delaminating.
- The seat contains ventilation, heating, airbags, or sensors near the damaged area.
- The same crack reappears after proper preparation and curing.
- The vehicle has rare trim material that is difficult to match.
The economics of a DIY repair can be attractive, particularly when several small worn areas can be handled with one compatible product system. But the cheapest kit is not always the least expensive outcome. A mismatched compound may require stripping, re-sanding, and recoloring the panel, while a careful repair with a compatible system can remain visually integrated for much longer.
There is also no honest universal promise about how long a home repair will last. Use, climate, sunlight, clothing, cleaning habits, and the flexibility of the original upholstery all influence the result. A driver’s bolster exposed to daily entry and exit will be tested much more severely than a lightly used rear seat. Treat durability as something to evaluate through the quality of the repair and the condition of the substrate, not as a fixed number of years.
Final Inspection and Care
Once the topcoat has cured according to the product instructions, inspect the seat in daylight and under angled light. Look for a hard perimeter, a change in gloss, visible filler, clogged perforations, or a color shift that only appears from one direction.
Flex the repaired area gently by hand and compare its response with the surrounding leather. The surface should not lift, crack, or produce a sharp stress line. Avoid aggressive tape tests or forceful picking at the finish unless the repair manufacturer specifically recommends that test; an unnecessary adhesion test can damage a repair that has not fully cured.
For ongoing care, use a mild cleaner approved for automotive upholstery and a soft cloth. Avoid heavy silicone dressings, household leather oils, abrasive magic erasers, and strong solvents. Products that leave a slippery film may make the bolster feel polished while increasing contamination and complicating the next repair.
Keep the cabin from becoming unnecessarily hot when possible. A windshield shade, sensible parking, and regular gentle cleaning reduce the stress placed on the finish. These measures will not reverse existing cracks, but they help prevent a repaired area from being exposed to avoidable wear.
Cracked leather car seats can often be fixed without replacing the entire cover, but the repair must follow the material rather than the label on the bottle. Identify the substrate, clean it without stripping sound finish, reinforce weak fibers where needed, build the surface with flexible layers, and match both color and sheen. On synthetic upholstery, use a compatible vinyl or synthetic-leather system. On perforated seats, preserve the openings and their original pattern.
The best restoration is not the one with the most product or the most aggressive sanding. It is the one that respects how the seat moves, how its coating wears, and where the damage actually ends.