Headlight restoration: why do cleared lenses turn yellow again?
A headlight lens that has been meticulously sanded, compounded, and polished to optical clarity will, in most cases, begin reverting to its degraded state within three to four months.
Merritt Vane·Updated: August 20, 2026·10 min read
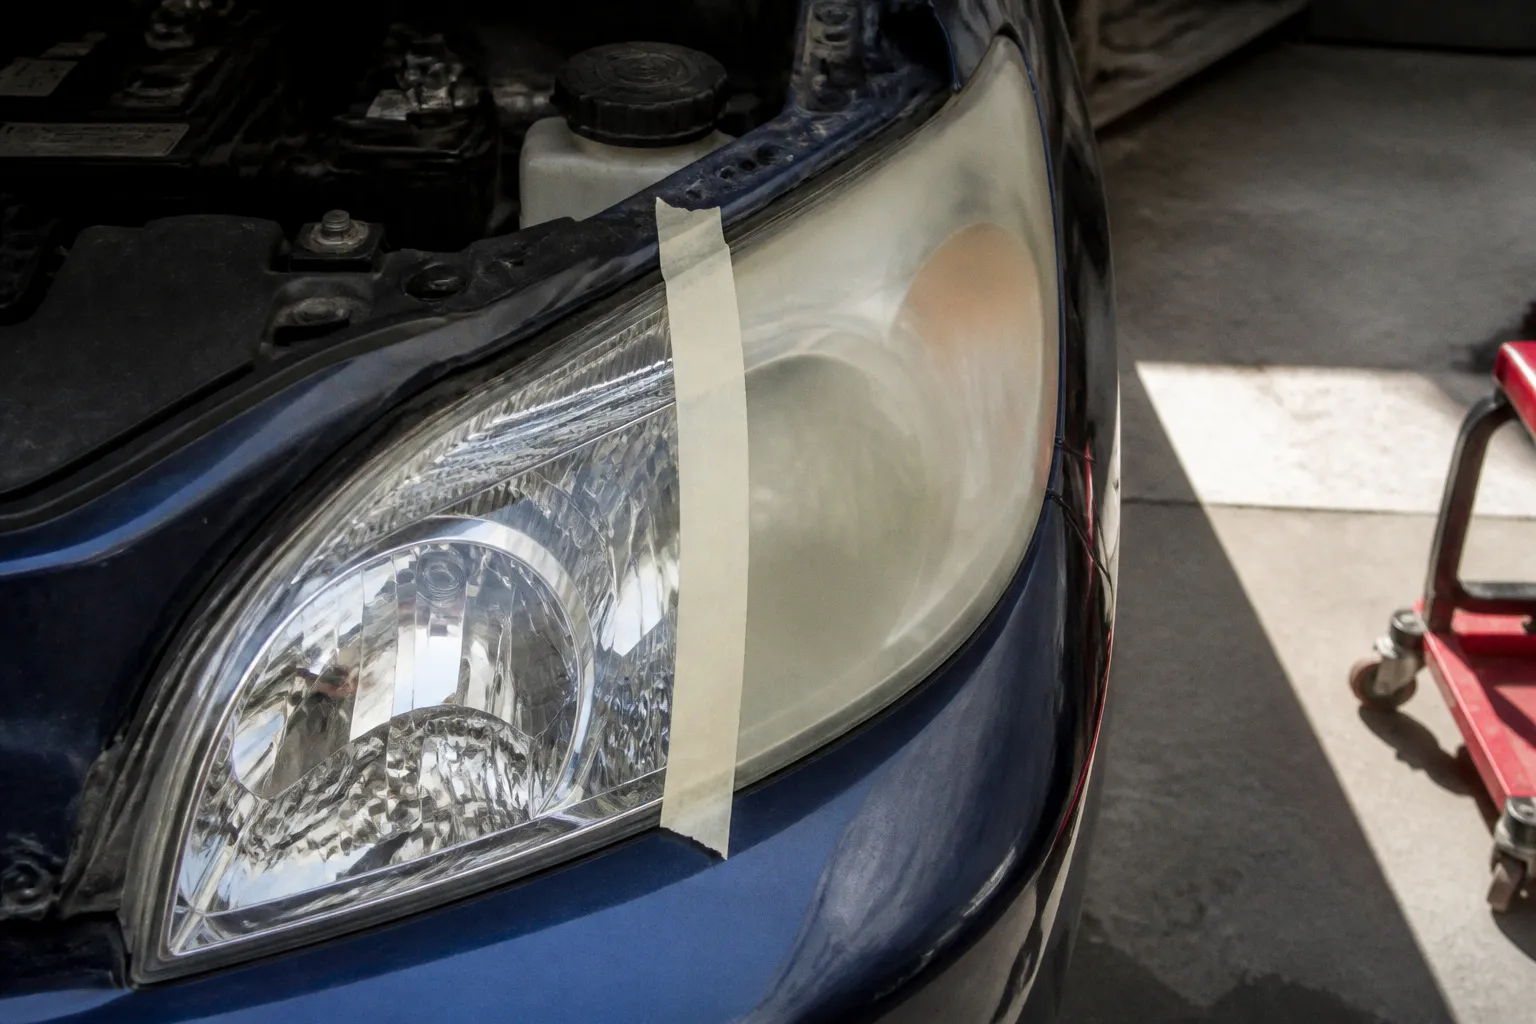
This is not a failure of technique or a sign of insufficient effort during the restoration process itself. It is the predictable, chemically inevitable consequence of exposing a polymer substrate to ultraviolet radiation without reinstating the protective barrier that the restoration procedure necessarily removed. The entire premise of most consumer-grade headlight restoration kits — that mechanical abrasion and surface refinement constitute a lasting solution — rests on a fundamental misunderstanding of what actually causes the yellowing in the first place.
The problem is not cosmetic residue. It is not road film, oxidation haze, or some superficial contaminant that a more aggressive polishing compound could overcome. The problem is molecular degradation of the polycarbonate itself, and until that mechanism is addressed with a durable ultraviolet barrier, every restoration is merely resetting a countdown timer.
The Polycarbonate Vulnerability: Why Lenses Degrade
Modern automotive headlight lenses are manufactured from polycarbonate plastic — a material chosen not for its optical permanence but for its extraordinary mechanical resilience. Polycarbonate offers approximately 250 times the impact resistance of glass, a property that makes it indispensable for a component positioned at the leading edge of a vehicle, exposed to stone strikes, road debris, and thermal cycling. No glass lens could survive that environment without shattering; polycarbonate absorbs the kinetic energy and flexes.
That same toughness, however, comes paired with a pronounced chemical vulnerability. The polymer chains that give polycarbonate its impact strength contain bisphenol A linkages — aromatic carbonate groups that are intrinsically sensitive to ultraviolet radiation in the 280 nm wavelength range. When photons at this energy level strike unprotected polycarbonate, they initiate a photochemical rearrangement within the polymer backbone. The result is not merely a surface stain; it is a structural alteration of the material itself.
This is why yellowed headlights cannot simply be "cleaned." The discoloration is not a deposit sitting on top of the lens. It is the lens — chemically transformed at a molecular level by repeated exposure to sunlight.
The Restoration Trap: Stripping the OEM UV Barrier
Every headlight lens that leaves a factory arrives with a hardcoated UV-protective layer applied to its outer surface. This coating — typically a siloxane-based or proprietary cross-linked polymer system — is engineered to absorb or reflect ultraviolet radiation before it reaches the polycarbonate substrate beneath. The OEM hardcoat is not decorative. It is the single component standing between the lens and photochemical destruction, and its expected service life under normal operating conditions is three to five years.
As this coating ages, it develops micro-cracks, loses adhesion in localized zones, and gradually becomes less effective at filtering UV radiation. The polycarbonate beneath begins to degrade in the compromised areas, producing the characteristic yellow-to-amber discoloration that vehicle owners eventually notice. By the time most people decide to restore their headlights, the OEM hardcoat is already substantially compromised.
Here is the critical detail that most restoration guides omit: the sanding and compounding stages of a standard restoration procedure do not merely remove the yellowed surface layer. They remove everything — the degraded polycarbonate, yes, but also whatever remains of the factory UV coating. The lens that emerges from a thorough restoration is bare, unprotected polycarbonate, polished to optical clarity but stripped of its only defense against the very radiation that caused the problem in the first place.
The restoration process does not fix the vulnerability — it exposes it. A freshly polished lens is raw polycarbonate with no UV barrier, and the clock starts immediately.
This is the restoration trap. The lens looks pristine. The owner is satisfied. And within weeks, the photochemical degradation cycle begins anew, often progressing faster than before because the remaining polycarbonate wall is now thinner from the material removed during sanding.
Photo-Fries Rearrangement: The Chemistry of Yellowing
The specific mechanism responsible for polycarbonate yellowing is known as photo-Fries rearrangement. When ultraviolet photons with sufficient energy — near the 280 nm absorption threshold — penetrate the polycarbonate surface, they cleave the carbonate linkages within the polymer chain. The resulting molecular fragments reorganize into dihydroxybenzophenone and related chromophoric species. These rearranged molecules absorb visible light in the blue-violet portion of the spectrum, which causes the material to appear yellow or amber to the human eye.
This is not a reversible process. The polymer chains do not spontaneously reassemble into their original configuration once UV exposure ceases. Each cycle of degradation permanently converts a fraction of the polycarbonate's surface chemistry into yellowed byproducts. Over time, the affected layer deepens, and the discoloration becomes more pronounced and more resistant to mechanical removal.
The rate of this reaction is governed by several variables: the intensity and duration of UV exposure, ambient temperature (which accelerates the kinetics), and the presence or absence of a UV-filtering barrier. In southern climates with high cumulative solar irradiance, the degradation proceeds measurably faster than in northern latitudes. But the mechanism is universal — any unprotected polycarbonate headlight lens on any vehicle, anywhere the sun shines, will undergo photo-Fries rearrangement.
What makes this particularly insidious is the latency period. The initial stages of rearrangement produce no visible change. By the time yellowing becomes apparent to the vehicle owner, significant molecular degradation has already occurred beneath the surface. The visible discoloration is, in effect, the trailing indicator of a process that has been underway for months.
Beyond Polishing: Selecting Effective UV Protection
If the root cause of post-restoration yellowing is the absence of a UV barrier, then the solution is straightforward in principle: apply a new one. The challenge lies in selecting a barrier durable enough to justify the restoration effort. Not all protective products marketed for this purpose perform equivalently, and the differences matter enormously in terms of service life.
| Protection Method | Typical Longevity | Mechanism | Application Complexity |
|---|---|---|---|
| Spray-on UV sealant | 3–6 months | Thin sacrificial film that absorbs UV and degrades instead of the lens | Low — aerosol application after polishing |
| Ceramic coating (SiO₂-based) | 6–12 months | Cross-linking siloxane layer with moderate UV resistance | Moderate — requires controlled conditions and proper surface prep |
| 2K UV clear coat | 2–3+ years | Two-component polyurethane or acrylic system that cures into a hard, UV-blocking film | High — requires spray equipment, respirator, and controlled environment |
| Paint protection film (PPF) | 3–5+ years | Physical thermoplastic urethane barrier that blocks UV entirely | Moderate to high — precision cutting and wet-application technique |
The critical distinction is between sacrificial coatings and structural barriers. A spray-on sealant is designed to degrade in place, absorbing UV damage that would otherwise reach the polycarbonate. It works — but it works by consuming itself, which means reapplication every few months is not optional maintenance but a functional requirement. Miss a cycle, and the bare lens is exposed again.
A 2K clear coat, by contrast, forms a cross-linked polymer film with significantly higher UV stability and mechanical hardness. Applied correctly — which means over a properly scuffed and cleaned surface, in appropriate temperature and humidity conditions — a 2K system can extend restored lens clarity for two to three years or more. The tradeoff is application complexity: these are two-component systems that require mixing, pot-life awareness, and spray equipment. They are not forgiving of shortcuts.
Paint protection film represents the most durable option because it operates on an entirely different principle. Rather than absorbing or filtering UV radiation, a quality PPF blocks it physically. The polycarbonate beneath never receives the photons that drive photo-Fries rearrangement. The limitation is cost and installation precision — the film must conform to compound lens curvature without distortion, and edges must be sealed to prevent moisture ingress.
A restoration without a UV barrier is not a restoration — it is a temporary cosmetic intervention with a chemically predetermined expiration date.
For the vehicle owner performing a DIY restoration with a consumer kit, the most pragmatic approach is to treat the included sealant (if one is provided) as a short-term measure and plan for a more durable topcoat. Many kits in the $15 to $30 range include a wipe-on or spray-on UV protectant that offers months, not years, of protection. Recognizing this limitation at the outset prevents the frustration of watching newly clarified lenses yellow again and concluding that the restoration "didn't work." The restoration worked perfectly. The protection did not hold.
Why Tail Lights Don't Share the Same Fate
A question that arises naturally in this context: if UV degradation is the mechanism, why do tail light lenses — exposed to the same sunlight, mounted on the same vehicle — remain clear for the life of the car?
The answer is material chemistry. Tail light covers are typically manufactured from acrylic plastic (PMMA — polymethyl methacrylate), not polycarbonate. Acrylic possesses a fundamentally different molecular structure that does not undergo photo-Fries rearrangement under normal solar UV exposure. Its carbon backbone lacks the aromatic carbonate linkages that make polycarbonate susceptible to the 280 nm absorption-triggered degradation pathway.
Acrylic has its own vulnerabilities — it is more brittle than polycarbonate and more prone to cracking under impact — but UV-induced yellowing is not among them under typical conditions. This is why you will see 20-year-old tail light housings that remain optically clear while the headlights on the same vehicle have turned the color of old amber. The materials are different; the degradation pathways are different; the outcomes are different.
This distinction matters for anyone approaching headlight restoration with the expectation that the same techniques used on tail lights (if any cleaning is needed at all) will produce equivalent longevity on headlights. They will not. Polycarbonate demands UV protection as a non-negotiable component of any restoration. Acrylic does not.
A Maintenance Framework, Not a One-Time Fix
The most useful way to think about headlight restoration is not as a single event but as the initiation of a maintenance cycle. The polycarbonate substrate is permanent — barring physical damage, it will outlast the vehicle. The UV barrier, regardless of which type is selected, is consumable. It degrades in service, and it must be renewed before it fails completely.
For owners who have invested in a 2K clear coat or PPF, the renewal interval is measured in years. For those relying on consumer-grade sealants, it is measured in months. Neither approach is inherently wrong; they simply represent different points on a cost-versus-convenience spectrum. The error is in assuming that any single application constitutes a permanent solution.
A practical maintenance schedule, then, looks roughly like this:
1. Initial restoration — Wet sand through progressive grits (typically 400 to 3000), compound, and polish to optical clarity. Remove all traces of the degraded OEM coating and the yellowed polycarbonate beneath it.
2. UV barrier application — Apply the chosen protection system immediately after polishing, before the freshly exposed polycarbonate has accumulated meaningful UV exposure. Even a few days of unprotected sunlight begins the degradation cycle.
3. Inspection and renewal — For spray sealants, inspect monthly and reapply at the first sign of diminished water beading or surface haze. For 2K clear coats, inspect every six months and plan for reapplication at the two-to-three-year mark. For PPF, inspect annually for edge lifting or yellowing of the film itself.
4. Replacement threshold — When the polycarbonate has been sanded and restored multiple times and the lens wall thickness has measurably diminished, or when internal reflector degradation has occurred, replacement of the entire headlight assembly — typically $130 to $430 depending on the vehicle — becomes the more rational choice.
The chemistry does not negotiate. Polycarbonate exposed to ultraviolet radiation will yellow; this is a property of the material, not a defect in manufacturing or maintenance. The only variable under the vehicle owner's control is whether and how effectively a UV barrier is interposed between the lens and the sun. Everything else — the grit sequence, the polishing technique, the compound selection — is secondary to that single decision.